Here’s the scenario: for day-to-day use, I have my printer set up to use draft quality, which is faster and uses less ink. I also have it print double-sided to save paper. For most emails, recipes, and such, it works just fine. And then I want to print something for crafting, where I want high quality, single sided printing. Sometimes I want it to remember that I’m using thicker photo paper, too. Sure, I can always remember to click on the properties and change them, but seriously, that’s sooo many clicks! I’d really rather say, “Hey Windows, print in crafty mode” and let it change all the settings for me.
I finally researched a wonderful solution. You make one printer look like several, each with different settings! In other words, you can define your usual “SuperPrinter 1234” to be “SuperPrinter EveryDay” AND “SuperPrinter USE THIS FOR PHOTOS.” (Yes, I need it to shout at me, haha.)
Giving credit where credit is due, Chris Hoffman from How To Geek wrote this article that tells how to do it: https://www.howtogeek.com/362957/how-to-install-the-same-printer-twice-with-different-settings-on-windows/. Chris, you made my day! I’m going to need these instruction again and again, and I’m certain that this link will break at some point in the future (my favorite links all get reorganized, eventually). And Chris references some things that my wonderfully crafty readers may not be as technical as Chris’ audience. I’ll rewrite the instructions here. I’m also taking you to the screens through a slightly different route than Chris does (there are always several ways to do things on the computer!). Thank you, Chris, for explaining it to me!
Before you start…
➀First, please read all the way through before starting. If this feels over your head, please ask your favorite technology explainer for help with these instructions (your family, your co-worker, your geeky friend). Each printer’s screens look very different because they have different capabilities. Because of this, it’s extremely difficult to answer questions about your printer specifically.
➁Understand that some printers do not have some of the features we will discuss here. Not all printers do duplexing (double-sided printing), handle thicker papers, or whatever it is you might want it to do. There’s nothing anyone can do to make your printer do something it wasn’t designed to do.
➂These instructions are for Windows 10. No, I don’t know how to do it for Android or Apple products.
➃This assumes you have a working printer that you can print to from Windows. If you don’t, this won’t help you until you do.
OK, if you’re still with me, let’s keep going!
Tip: By default, all but the last screenshot are closed. Some people want to print the steps and use the least amount of paper to have a reference to jot notes on and file (and scroll up to the top to close this background info to save another page or two). Note that it will print exactly as it’s shown on your screen, so if you want certain screens printed, by all means, open them! As you read through the instructions for the first time, please open the screens to see them unless you’re familiar with them. When you decide to tackle the process, refresh the page (press F5) to close all the screen shots. Open each one as you go along so you can keep track of where you are.
Some Background and Terminology
When you set up a printer in Windows, Windows finds a printer driver, which is a reference file written by the printer’s manufacturer that tells Windows how to talk to (or “drive”) your printer. Once it finds those instructions, then it sets up a port, or location inside of Windows, where it can communicate with your printer.
What we’re going to do is set up another printer that points to the same port name and uses the same printer driver, in other words, the same printer. Then we want to set different printing preferences (like high quality vs. draft) and call it something we can remember.
Finding the Port Name
- Open the Printer Settings systems dialog.
The easy way to find it is to find the “Type here to search” bar at the bottom of your screen, and start typing “printer.” After you get a few characters typed, you’ll see the “Printers & Scanners System settings” option appear and highlight in blue. Select “Open.”

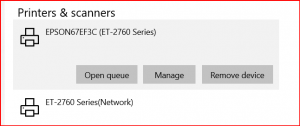
- On the Printers & Scanners screen, select the printer you want to duplicate by clicking on the name of the printer.
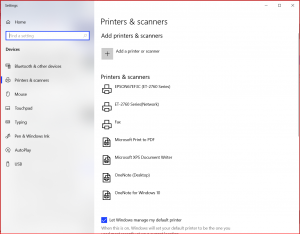
Select Manage from the options presented.
- The Manage your device screen displays (it’s a pretty blank screen except for the handful of options). Select Printer properties.

- The Properties dialog displays. Click on the Ports tab. There will be one port checked. Make a note of which port is selected.

- Press Cancel to get back to the Manage your device screen (in step 4). Then click the back arrow at the top of the screen to go back to the Printers & Scanners screen (in step 2).
Add a new printer
- Click on Add a printer or scanner. It’ll think a bit and show a progress bar (should take only a few seconds), then possibly display some other printers and a link titled The printer that I want isn’t listed. Select that link.

- The Find a printer by other options dialog appears. Select Add a local printer or network printer with manual settings. Then press Next.

- Now select the same printer port you noted in step 5. Be sure the Use an existing port is selected (it’s the default). When choosing the port , they may not be listed in the same order as before, and the description may have additional text than what you saw before. That’s OK. Press Next to continue.

- Now it asks to install the print driver (those instructions). The default is what is already installed. You want that. Press Next.
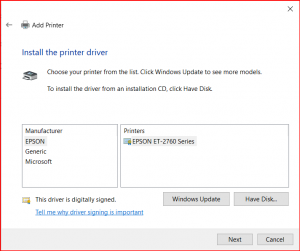
- Then it asks which version — you want the one that is currently installed (the default). Press Next.

- The next question is what to name the new printer. Decide on what you’d like to call it. I have two printers, so like to keep the model number in the name, then add something descriptive. My example is “EPSON ET-2760 USE THIS FOR PHOTOS.” (No, you don’t have to use all caps — I just want this to catch my eye!) Choose wisely; it’s tricky to change or delete it (covered below).

- It’ll flash that it’s installing, then it will ask about sharing. If you’re not sure about this, you likely don’t need to share it, so just press Next.

- You have successfully added the printer! Now press Print a test page to make sure it works.

- Press Finish to return to the Manage your device screen. Notice that the dropdown has your new printer on it.
Tip: The dropdown is important if you want to change the properties in the future. While you have created a “new” printer, because the printer points to the same port that has only one printer attached, the new printer is a new “function” of your printer. If you have an all in one printer, click the dropdown and you might see a scanner setting, too. Before you go changing settings, be sure you have selected the functionality that you want to change!

Configuring the new printer
- On the Manage your device screen, select Printer properties. This is brings up the Printing Preferences dialog box where you can change the settings for the new printer. Shown below is the Printing Preferences for my Epson Ecotank ET-2760. Unless you have the same printer, your options will be different. Change these settings to match what you have named your new printer. For me, I’ll change the quality to a higher setting and change the paper type. You can always come back to this screen to change these settings by following the first four steps, ensuring that you’ve selected the right printer (function) — see the tip on step 14.

- When you’re done, press OK to save your changes, or Cancel to discard them. You’re all done!
To use the new printer
Despite the system settings for printers calling your new printer a “function” of the printer, when you go to print, it will display as a separate printer.


To edit or delete the printer
The current version of Windows 10 doesn’t have a way to do this in the system settings that we’ve been working in. Windows did give us a way to get back to an older version that can do this. Accessing it is a bit different than other programs that you’re used to. Don’t worry, it’s not hard, it’s just different!
- Use the key combination Win + R to open the Run app. (Or type run in the Type here to search box at the bottom of your screen.)
- Cut and paste the entire text string below into the Open field:
shell:::{26EE0668-A00A-44D7-9371-BEB064C98683}\0\::{2227A280-3AEA-1069-A2DE-08002B30309D} - Press OK to run that program.
- You’ll see an interface where all the printers are displayed. Use the menu options to edit the properties, change the name, or delete.