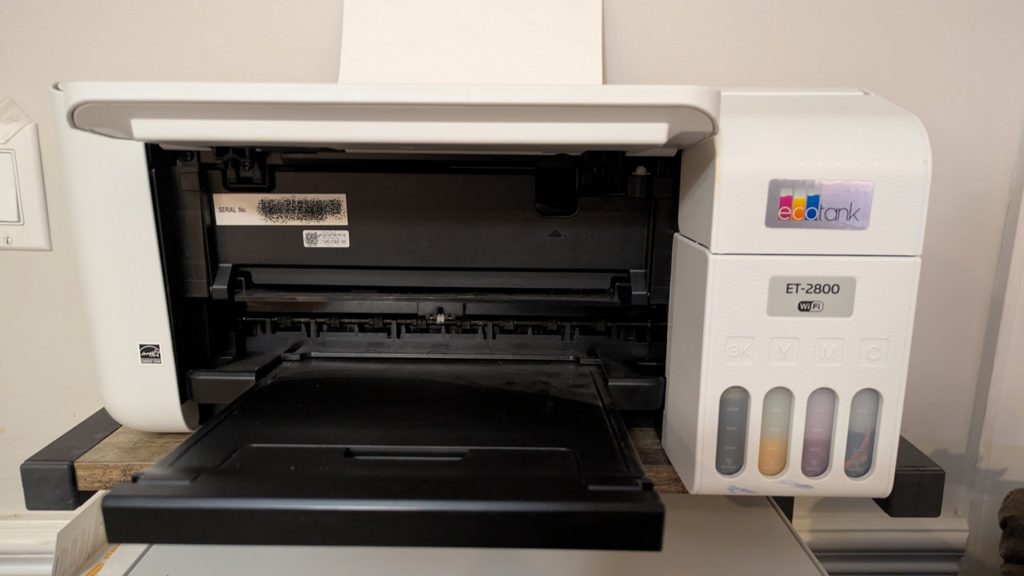
Models differ in what needs to be done: 2720s need a screwdriver, some need to pull down a black plastic panel located under the front panel, some have a latch, some lift up with no front panel), so if these instructions don’t apply to you, see your user’s manual. You can download it from epson.com/support. Shown in these pictures is the Epson ET-2800. Your printer may vary.
The first thing to do is to tilt the front panel all the way up, as shown in the picture, below. In this case, there’s a black panel that has a finger notch in the upper right of the panel. Pull that down.
The picture below shows the panel pulled down.
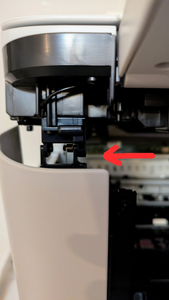
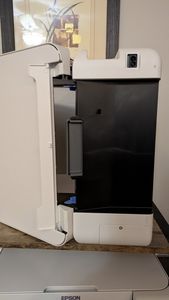
Now you can open up the top. Some printers have a latch that needs to be unclipped, shown in the pic below shown by the red arrow.. To do that, put your hand on the latch, then twist it to pop out one of the pins that hold the bottom part in the latch. Yes, it will feel like you’ll break it. Even if you do, gravity will still hold the top down. (I haven’t been able to break it. I kinda wish I could so I didn’t have to fuss with it!)
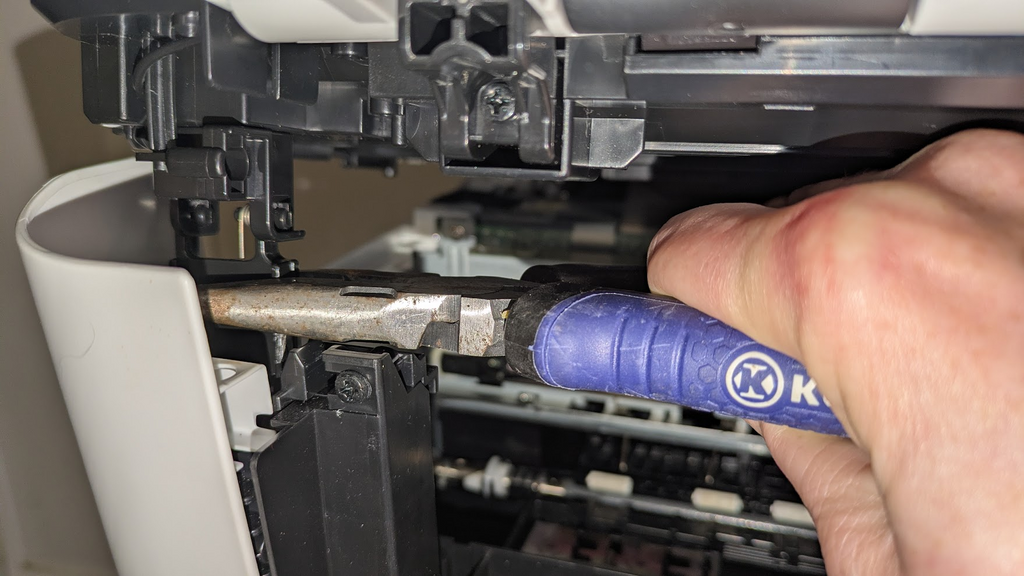
If you don’t have the finger or hand strength to do this, you can use needlenose pliers to twist it. Grab the latch with the pliers as shown in the picture, then push the handle of the pliers towards the back. It should release. (Yeah, it may feel like you’re going to break it.)
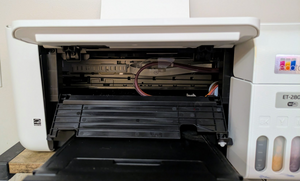
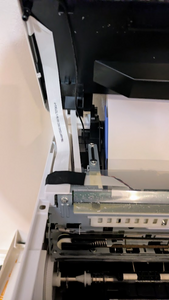
Once it’s released, don’t open the top too far! The latch has a purpose! If you open the top too far, or you can pull out the flat scanner cables (that’s why the latch exists). The flat, white scanner cables are at the back, left side of the printer, seen in the very back corner in the picture below. You can open the top about 60 degrees, or about 2/3rds of the way. An easy way to judge is to use an empty toilet paper tube to prop up the front corner. Don’t open it too much higher than needed to get the tube into the printer. If you do and you see the cables that are loose (or you turn it on when you’re done and get a scanner error), scroll down to What if the cables slide out?

Once you’ve got it propped open, you’re good to work inside the printer!
What if the cables slide out?
The scanner cables are white, flat ribbon cables located at the back, left corner of the printer. In the picture, the larger flat cable is taped with black tape to the printer case. Underneath it is a narrower cable that you can’t see and there’s a third, even narrower cable to the right of those cables.
If the scanner cables slide out, it’s not the end of the world. They are designed to slide out rather than destroy a soldered connection. All you need to do is locate where they go and slide them back in. How will you know they aren’t seated properly? One of two ways:
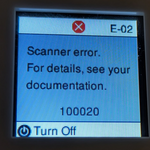
- When you turn your printer on, you will get an error that says there’s a problem with the scanner and it won’t let you use the printer until the scanner cables get put back in. There will be an E-02 in the upper right (E for error, 02 meaning it’s the scanner). At the end of the unhelpful message (the documentation doesn’t cover this!), there’s an error number: 100020. The last two digits may vary.
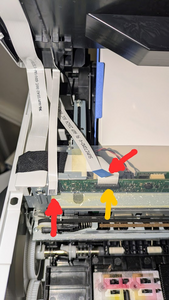
- You see that the cables are actually detatched. In the picture below, there are two cables that are obviously detatched, indicated by the red arrows. The third cable is still seated properly, indicated by the yellow arrow.
All you need to do is find the little connectors and slide the ends of those cables back in. The ends slide in much like a chipped credit card slides into credit card reader. Just insert the flat end into the flat opening and friction will hold it. The picture that follows is a closeup of the connectors, indicated by the red arrows. The connectors are black rectangles with little metal contacts (the left one has 5 contacts while the right one has 17 contacts) and the cable fits in the opening so the silver contacts on the flat cable touch the contacts in the connector.
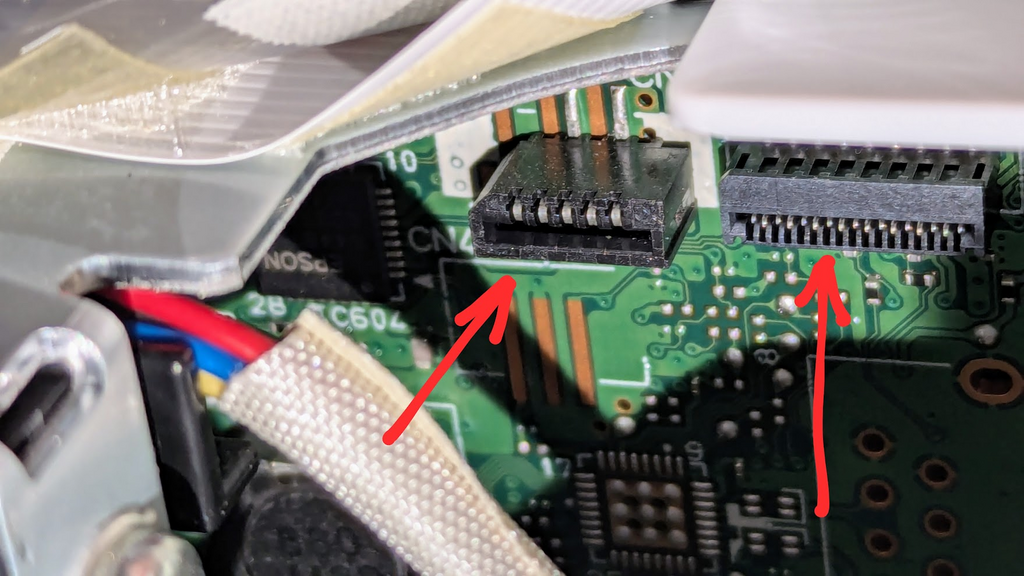
The catch? These connectors are located on the back side of that printed circuit (green) board, just under the black tape that is holding the wider cable down. It’s tricky to find it and it’s a very small area to work in!
Before I explain the best way to insert these cables, here are a couple of videos that help you put them back in. I recommend watching one or both so you can see how they do it. The two videos approach it differently, so it’s a great way to see how they do it.
- The Printer Guy: https://www.youtube.com/watch?v=7fU31qEi7uA Uses tweezers without taking the case apart.
- BCH Technologies: https://www.youtube.com/watch?v=BTKtdRAHLxA Beginning at 2:14, they take the side off (they are using a 2720, other models may have a different method of taking the side panel off) Gives a good closeup of where the cables go. You don’t need to clean them if they’ve come out on their own — they can oxidize while firmly seated.
Here’s how I did it:
- TURN THE POWER OFF. Never work on connecting cables when the printer is on.
- Turn the printer on it’s side so the side with the cables is on top and the back is towards you. Then open the lid almost all the around 45-60 degrees, as shown in the picture. If your tanks are closed, the ink will not leak.
- Now peer into the top hinge area. In the picture, the view is looking over the top hinge into the printer. You can see where the two flat scanner cables insert into the connectors near the top edge (in this orientation) of the green circuit board.
- Put the narrowest cable in first. You’ll need to shine a flashlight in with one hand while manipulating the cable with the other. You might be able to use your fingers or you may need to use tweezers to help — this is an excellent use for the Cricut hook tweezer! Look at the narrow cable (shown in this picture, above). The five silver contacts on it need to face to the left to touch the five contacts in the bottom connector. (See the picture below that is now rotated to show the connectors in the orientation in which you’re viewing it.) Put the wider cable in next. The blue side goes to the left and the 17 silver contacts go to the right. It’s going to go into that upper connector right where that line of metal contacts is (kinda looks like a zipper). .

- When you get them both in, you can close the top (or close it enough so the top doesn’t latch if you still need to do the third cable) and set it back upright. Be sure they are pushed in as far as they can go (it doesn’t need a lot of force).
- If you need to do the third cable, that’s much easier to see on the front, where the yellow arrow is on this picture, above.
That should do it! It’s not that difficult, it’s just in a really awkward location.
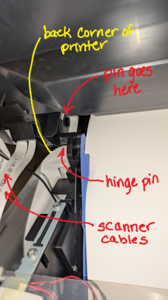
There could be one complication. The hinges on some of these models separate really easily. You’ll want to give up when it happens. If it does, take a quick break. You’ve done fantastic so far and this is just a minor setback! You need to find the hinge pin that’s on the bottom of the printer and find the hole on the top. The pic shows the one on the left and is annotated to show the left, back corner of the printer and the scanner cables (to orient you), then the hinge pin and the hole where the hinge pin goes. There’s a similar pin and hole on the right side. Line them both up, then give it a good pull so the pins go into the holes. I won’t lie, it’s easier to say than do. If you have someone who can help you to align it, that might be less stressful! It’s such a simple idea, but executing it can be frustrating. But you’re almost done!
OK, if all three cables are in and the hinges allow it to close, button it up and power it on. With any luck, you are back in business.
2 Replies to “How to Open an Epson EcoTank”