You’ve got prints that look weird. Maybe the greens look blue and the oranges look red (meaning your missing yellow). Perhaps your pinks are printing a strange light blue (your magenta is out). Or photos look great except for some weird white areas that should be really dark (your black is out). Sometimes you’re missing several colors, or worse, nothing is printing at all. The most common reasons that EcoTanks lose one or more colors is that air gets into the system.
This article is probably longer than you want to read. I know you want to get right to printing again! But understanding how it happened helps you determine the best way to fix it. You’ll see a number of solutions on the internet that show you how to fix this clog: printing purge pages and doing multiple cleaning processes on the printer are the most popular, but they aren’t efficient and have definite downsides. The syringe method is the most efficient but it’s not mentioned a lot because people don’t understand the nature of clogs and it does take a bit of confidence to go inside your printer. Understanding what happened and that it’s not difficult to fix it will help a lot!
How did the air get in there?
It helps to see what the ink supply system looks like. The tanks are at the front of the printer. The sides of the tanks are visible in the front so you can see the ink levels. Supply lines run from the tanks to the printhead and connect to dampers, which regulate the flow of ink into the printhead.

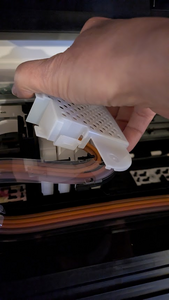
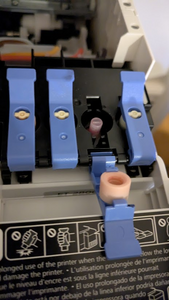
The printhead has a white cap with ventilation holes. In this picture, the cap has been taken off to show the dampers in place on the printhead. The ink supply lines attach at the top of each damper.
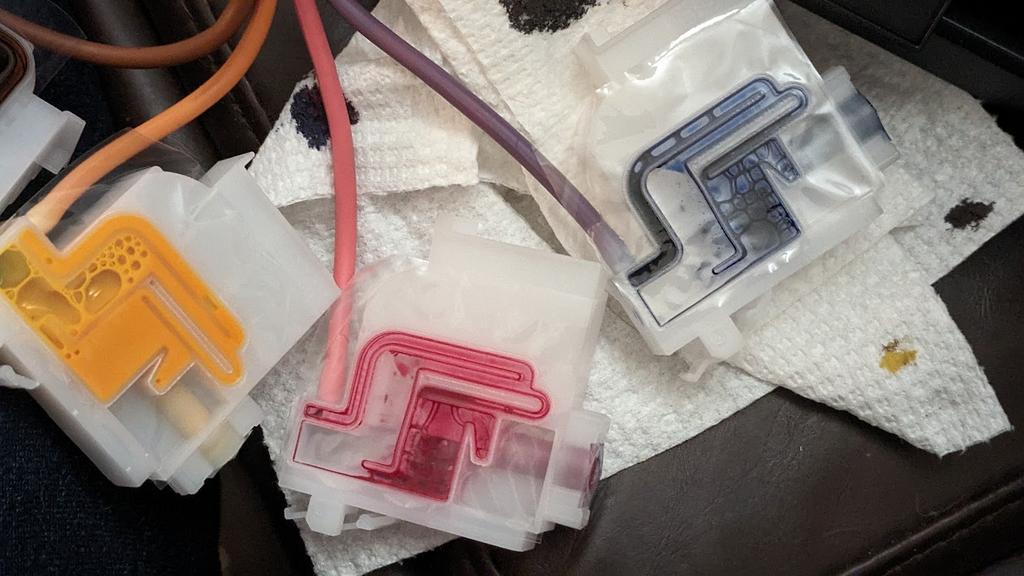
This is the side view of the damper. One side is made of a thin film, much like the film on a frozen meal. It allows us to easily see the inside.
The ink supply line connects at the top. Ink is pumped into the damper through the supply line. The design of the interior regulates the flow of ink into the printhead. The bottom outlet is where it connects to the printhead. You can see some air in the damper.
How does the air get in there? That film expands and contracts with changes in temperature and air pressure, similarly to how the film on your microwavable frozen meal expands when it gets hot, then falls as it cools. This expansion and contraction causes tiny amounts of ink to be pushed back into the tank. Air seeps in through the connections and rises to the top of the damper. Air collects at the top and doesn’t hurt anything until finally there’s enough air in it to block those tiny tubes.
Daily and seasonal temperature and pressure changes are definitely a culprit. So are high pressure and low pressure weather events, such as hurricanes and severe storms that can change air pressure and temperature very quickly. But the biggest culprit is modern homes. If you’ve got the printer sitting in front of a window that’s very hot, very cold, or very drafty, that can add to the problems. The biggest problem is your HVAC system. Every time it turns on, the fan blows air and raises the air pressure. It blows air that is a different temperature than the room air. Then, when it stops, the air pressure drops and there’s no more flow of air with a different temperature. Depending on how often this happens, how much pressure your HVAC system has in that room, the size and shape of the room, where the printer is located with respect to the vents, and many other variables determines how fast or slowly the dampers fill with air. I had one printer go five years, another 18 months, and some can have it happen in three months or less. There’s really no way to gauge.
What happens when it fills with air?
When the damper finally fills with air, ink can no longer flow into the damper. There’s usually a small amount of ink left that gravity will help feed into the printhead, then suddenly, there’s no ink left. Your printer will continue to print, but if it happens in the middle of the print, it usually starts to sputter and within a quarter inch or 5cm, it lightens a bit then goes completely out.
Since colors are used at different rates, it’s probable that one color will fail first, but the same conditions that happened to the first color have happened to all of them, so the others are not far behind. This leads to a frustrating series of colors going out, first yellow, then black, then magenta. Sometimes it happens while your fixing the first color, sometimes it devilishly waits for a time after you think you have it fixed. If you didn’t know about the problem with air in the dampers, you’d be convinced that your printer is dying, or maybe that your ink is bad, or there’s some other horrible reason your printer is suddenly clogging so much. The reality is none of that is true. It can also happen that you go to print one day, whether the printer has been sitting for months or just a few hours, and many colors don’t print, or possible no colors are printing. It’s the same problem: air has infiltrated the damper and the air is blocking the flow of ink. It’s clogged, but not with a clot of dried ink that needs to be broken up, it’s air that needs to be removed.
Solving the problem: Option 1, using the printer’s cleaning features
You can do cleanings to get it out, but be aware that a printhead cleaning uses 1ml of each color and a power clean uses up to 15ml of each color — and all of this goes straight into the waste ink collector, which is either waste pads (on inexpensive models) or a replaceable maintenance box (on more expensive models). When these reach their capacity, the printer will refuse to print until it’s fixed. It’s a pain when it happens, but totally fixable and there’s no damage to your printer. There is absolutely no need to replace it sooner than when it says it needs to, because it’s simply a sponge that catches the waste ink with no ability to alter the quality of your prints and it has no effect on clearing clogs. It can take quite a few printhead cleanings, and it can even take *two* power cleans to get it working.
Solving the problem: Option 2, printing purge pages
You can do purge pages to get the air out, too. Plan on printing 10-50 pages or more. You can do the four-color kind or the single color, it really doesn’t matter. It will eventually “print” out enough air to get the ink flowing again. However, if you’ve noticed the warnings that low ink can damage the printhead, that’s exactly the problem when you’re printing purge pages with no ink flowing. I don’t recommend doing very many as it can delaminate the printhead and cause it to leak ink or the printhead to not function. There is no fix for that; DIY fixes require tearing down the printer *if* you can find a replacement printhead.
A note on four-color purge pages vs single color purge pages: There’s some advice floating around that says four-color purge pages give your printhead a chance to cool off one color while printing another color. The problem is that piezo printheads use a technology that doesn’t use heat to print, so the heads are not generally running hot (other printers heat the ink and are definitely at risk of literally burning up if there’s no ink while printing). The more probable problem is that the rubbery coating delaminates and deforms without the ink acting like a lubricant. This effect is cumulative, so stopping and starting to “cool it off” doesn’t matter because it’s not generally hot (though run it without ink long enough and the friction will heat it up and can burn the printhead). The deformation takes a while to happen, but over time, it will ruin your printhead.
A shared deficiency of Option 1 and 2
Both methods can cause issues for your printer. Cleanings fill up your waste ink collector and will stop you from printing when it gets full, while purge pages can actually damage your printhead. Both of these methods WILL eventually get the ink flowing. Here’s the biggest problem: both methods remove just enough air to get the ink flowing, leaving just a few drops of ink that are quickly pumped out, so your clog will happen again much sooner.
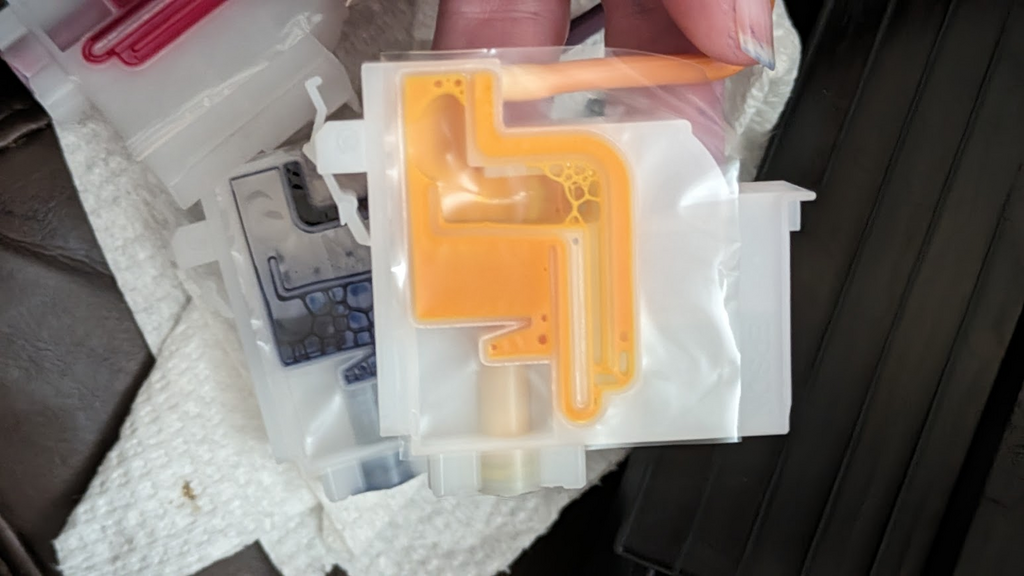
In the pic below, the yellow ink was the color that failed and the air drawn out (I was too excited to get the pic, so I still had a little more to draw out afterward). The magenta and cyan were still working despite how little ink was in there. It was probably a matter of another couple of prints before they stopped printing, too.

Option 3: Using a syringe to draw all the air out
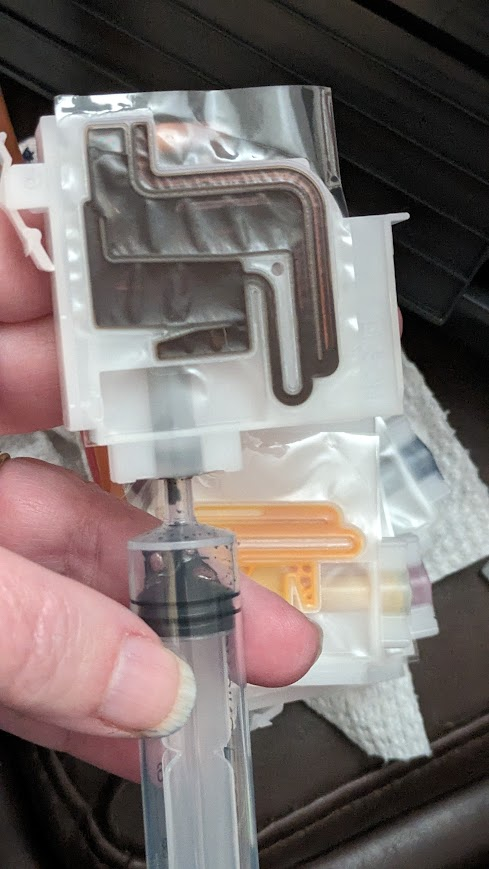
The most efficient method to get the air out is to open the printer and use a syringe to draw out the air. The outlet where it connects to the printhead is designed to be the perfect size for a syringe and you can get all the air out easily. The pic below shows how the syringe fits into the damper (it also shows that black ink is very dark and photographs poorly — you can’t tell from the pic if it’s full of air or ink! It’s easier to see in person).
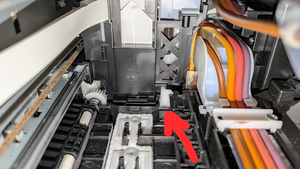
Yes, it can be intimidating to open your printer, but you don’t have to “take apart” your printer, it’s designed to fix this problem by removing the printhead cover (it’s there to ensure the dampers are properly in place; see pic below) and unclip each damper to draw out the air. This is how an Epson Service Center would fix your printer if you took it in and paid a whole lot more money than the cost of an oral medication syringe available for a few bucks at the pharmacy.
This video shows you, in real time, how to do this. Watch the first three minutes (yes, only 3 minutes — about the time it takes to do one printhead clean) for how to do all four dampers: “How to Fix EcoTank Blank Pages & Convert it into a sublimation printer.” https://www.youtube.com/watch?v=AmYGw2QcwH0 The remaining 2.5 minutes of the video shows how to remove all the ink in the tanks in the same manner, so they’re using a huge syringe; a small syringe, like the ones shown in the pictures in this article, works great.
A note about the syringes. There are two kinds of tips: a smooth tip and the Luer lock kind that locks on attachments (usually needles for health care, but also things like tips for gluing). You want the smooth tips that looks like the ones in the picture, below.

Some tips to help you. OK, seven tips sounds like a LOT, but it covers nearly everything that could happen. And some of them are really basic but easy to overlook or answer questions that people have asked me.
TIP 1: Turn your printer off before starting. Don’t try to fix anything while it’s turned on.
TIP 2: Be careful about opening the top of the printer too far because it can pull out the flat cables that connect to the scanner. They are designed to slip out if pulled to far. If they pull out, you’ll get an error E-02, “Scanner error. For details, see your documentation. 100016” It’s not difficult to put them back in, you just have to know where to look. (See this post for details.) If your model has a latch, that can be difficult to open. see How to Open an Epson EcoTank.
TIP 3: View the linked video (above) to see how to unlock the printhead. There’s a small, white plastic lock on the left side of the printhead that needs to move out of the way to allow the printhead to move freely. The picture shows the location of the lock as seen from the left side of the printer looking down towards the right side, though the printhead has een moved to the left side of the printer and isn’t in view. There are several ways to unlock the printhead lock, the video show how to turn the gears on the left side of the printer to unlock it easily.
TIP 4: You must open the ink tanks (where you put the ink in) to equalize the pressure, otherwise the suction won’t allow the air or ink to pull out.
TIP 5: Rinse your syringe between colors to avoid contaminating the ink. Clean syringes also allows you to put any ink you pulled into the syringe to be put back into the proper ink tank.
TIP 6: Watch the video at least twice. The first time gives you the general idea. The second time will allow you to look for specifics or clarify what you you’ve seen the first time.
TIP 7: I’ve been a Girl Scout leader at all levels, plus I’ve taught adults at all levels of technology, including college students, terrified adults learning a program for the first time, seasoned programmers at programming conferences, and even my 92 year old mother-in-law. With very few exceptions, the average adult with typical dexterity can do this. I wouldn’t recommend it otherwise! Watch the video at least twice. It’s three minutes long. If you can build IKEA furniture or clean the filter in your washing machine, you can do this.
Bonus benefit of the syringe technique
You can remove the air at any time before you get a clog! You don’t have to wait until there’s a problem. You can actually prevent this from causing problems for you.
You may hear advice that printing once a week will prevent clogs. It can prevent ink from drying on the printhead, although the capping station does a fantastic job of that. The capping station is underneath where the printhead parks itself and has a part that covers the printhead, much like the cap on a felt-tip marker. It also has pads underneath that collect excess ink and stay damp, so it’s not likely that the printhead will dry out very quickly. Printing a nozzle check once a week moves a tiny fraction of a milliliter while printing a four-color purge page or a full page, full color image uses about 0.1 ml of each color of ink. With a capacity of up to 15ml, that doesn’t do much to keep the dampers full. And once air gets in, it rises to the top where it’s out of the way and takes up space until it finally fills the damper. In short, printing once a week probably doesn’t do any good. Do try to print as often as you can. Most of the time, the problem with irregular or infrequent printing is air, and once you know this trick, you won’t worry about how often you print.
Removing the air periodically is the only way I know of to prevent this very common type of clog.
What if this doesn’t work?
I am a programmer and have worked with printers over my entire 40+ year career. I’ve helped quite a few people with their EcoTank printers, including my family members and I own two. Usually this is all that’s needed for most EcoTanks. Occasionally a shoe-shine method is needed that uses a damp paper towel (another few minutes), and rarely do you need a few printhead cleanings afterward to pull the ink through. See General How to Manually Clean your Printhead (AKA “Shoe-shine”).
One Reply to “My EcoTank is Missing Colors! Help!”