There are several reasons when you can do a fairly quick process to manually clean the dried/drying ink and any microscopic debris that has collected on your printhead. You can do this when:
- You’ve got some nozzles clogged that are leaving light, random lines in one color
- You’ve used the syringe method to unclog missing colors and it didn’t work
- You’ve tried printhead cleanings and nothing is changing
- Your nozzle check looks good but you’re getting random marks, like scratches, small marks, or droplets of ink on your printouts.
The basic idea is this: put a damp towel in the area where the printhead travels and move the printhead over the towel a few times to “shine” it up. This removes excess ink or tiny debris from the printhead. Dried sublimation ink is very water soluble so a damp paper towel quickly rehydrates it, plus the gentle abrasion on the printhead can quickly remove whatever’s on the printhead.
Yes, the printer’s printhead cleaning does do something similar. Here’s what a cleaning does:
- The printhead is gently shaken to agitate the ink. Since clots of ink can dissolve in ink, this can dissolve small clots or at least dislodge them if they’re blocking one of the small tubes.
- A plastic wiper is used to clean the exterior of the printhead. It doesn’t use any extra moisture, just a plastic piece that scrapes the exterior.
- A separate cleaning pump is used to pull ink through the printhead. The ink is used as a cleaning solution to dissolve any dried or drying ink and if there’s any external debris, the ink can wash it away. This ink is put into the waste ink collector.
The plastic wiper that’s used is kind of like using a credit card or a squeegie on a spill on your kitchen counter. Many times it works great, but sometimes it’s ineffective. Sometimes you just need a damp paper towel and a little bit of extra pressure can get that up easily. That’s the purpose of the “shoe-shine” method.
The shoe-shine process
You’ll need a half of a paper towel, some water to dampen it, and time to watch a 2.5 minute video once or twice. And maybe an empty toilet paper tube to prop open the top of the printer.
- Watch this video at least once, if not twice: https://www.youtube.com/watch?v=S0wZbvPeHDQ Be sure you feel comfortable with what they’re doing before proceding. The following steps are notes that follow the video.
- Turn off your printer.
- Open the top of your printer. On some models, this can be the hardest part!
- If you need help, see How to Open an Epson EcoTank
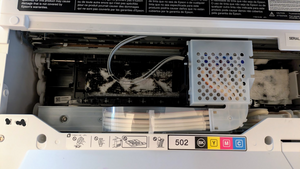
- Unlock the printhead carriage.
- Look for the white gears at the bottom of the printer on the left side. Find the middle gear and rotate it towards the front of the printer. You’ll hear a click near the printhead and it should be released. You can move the printhead to the left.

- Fold a half sheet of paper towel in quarters lengthwise and dampen it. Just damp is fine; dripping is NOT. Lay it in the track where the printhead travels. The video shows a fabric towel which is much thicker; it’s a lot easier to use a paper towel.
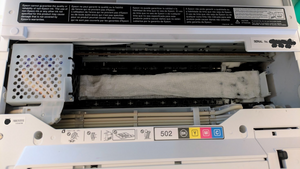
- Move the printhead over the paper towel, then move it back and forth over the paper towel 2 or 3 times. The picture below shows a rather black paper towel! Don’t worry about whether you can see all the colors or not. Two or three times is sufficient, then remove the paper towel.
- Close up the printer and do a nozzle check. To do that, on the screen, use the arrow keys to scroll to Maintenance, press OK, then follow the directions for the nozzle check that should be the first option on the screen. You should have a much improved nozzle check!
What if this doesn’t work?
There’s a chance that it gets worse. All that means is that the towel pulled out some of the ink from the nozzles. It’s fine. Just do a couple of printhead cleanings (the one that you do after the nozzle check).
Sometimes it can take more than one printhead cleaning, especially if you’ve used the syringe method to remove air that’s clogging the ink supply. You can repeat this series four or five times:
- Do a nozzle check. It will ask, “Are there any missing segments?”
- If there are no missing segments, you’re done! Use the down arrow to select No and press OK and follow the prompts.
- If there are missing segments, select Yes by pressing OK.
- It will ask “Clean print head?” Press OK to select Yes.
- It confirms, “Clean print head to correct missing dots.” Press OK to select Yes.
- It will prompt to use letter/A4 paper — you can use plain paper. Press the Start button (the diamond with the vertical line in it).
- It tells you that it will take 3 minutes. Don’t turn the power off during this.
- Repeat twice more for a total of 3 times. Stop if you get a good nozzle check!
- After 3 sets of nozzle checks/printhead cleanings, press the HOME button on your printer. This resets the consecutive maintenance counter. This prevents a scary error telling you about a printhead problem that is solved by turning off the printer for 12 hours to reset the counter. Just press the HOME button so you don’t get that error.
- Repeat as long as the nozzle checks are changing, whether better or worse (it can get worse before it gets better). If you get three or four in a row that don’t have a single segment that differs, take a long break of 8-12 hours. The good news is that I’ve never had one go more than 5 sets of nozzle checks/printhead cleanings.
One Reply to “How to Manually Clean your Printhead (AKA “Shoe-shine”)”