Last year, I blogged about my experience using Sharpies to decorate mugs and other ceramics. I used a series of Sharpie and other brand permanent markers and none of them worked well enough for me to spend any amount of time and effort on something useful for me or as a gift. I had previous experience with some other products designed for ceramics, and wanted to see what else was available. I’ve got some excellent results to report!
But first, a word on the whole Sharpie craze. There are a lot of people that really, really want this to work. Me too! How nice would that be if I could whip out one of the millions of Sharpies that are all over my house and turn dollar store mugs into wonderful gifts? But, sadly, it doesn’t work. Well, it might work well enough, but after a few weeks (or even days) of use, the pigments will chip, flake, or wash off. Sharpie ink in multipurpose permanent ink, suitable for use on many surfaces. It will stick, but it won’t stick to all surfaces permanently, particular non-porous surfaces, like ceramics.
Ceramics are created when a glaze containing tiny particles of silica is applied to earthenware, then fired in a kiln. The temperature varies based on the kind of glaze applied. Glazes considered “very low temperature” fire between 1112° and 1566°F (605° – 850°C), and go up to 2530°F (1390°C). This results in a vitreous (glass) surface that is impervious to liquids.
Given that the surface of the ceramic piece that we want to decorate needs to get to well over 1000°F to alter its surface, I’m certain that the only thing affected by a 300°-500°F oven is the ink or paint. Most general-purpose craft supplies aren’t made to be heated, and the pigments may be heat-stable only to about 200-250°F (which is why certain colors fade or become dull in the oven). Many general-purpose craft supplies use a solvent that will dry quickly (like alcohol or water), so heating something that’s already dry might not accomplish anything other than dulling the color. Heat does not necessarily help pigment adhere.
My dad used to say, “Use the right tool for the right job.” Sometimes you can use the heel of your shoe as a hammer to hang a picture, but most of the time, a hammer works much, much better, particularly if you’re, say, adding on to your house. We should be searching for the right medium to decorate ceramics, not trying to make something do what is wasn’t designed to do. We want something that, if it’s heated, is designed to go through some sort of chemical or physical change to permanently adhere to a non-porous surface.
Fortunately, there are a number of inexpensive products available. I took a walk through my local crafts store and found these:
| Medium (with link to manufacturer page) | Locally(Nat’l Craft Store) | Amazon(FS-free shipping; P-Prime eligible) | MSRP | Dick Blick(Free shipping over $99, otherwise flat $8.95) |
| Sharpie oil-based paint markers | $4ish | $4.86 FS | $3.79 | $3.03 |
| Nicole Rainbow Markers | $4.49 | Darice brand for $3.87 add-on | ||
| FolkArt Enamel Paint | $2.29 | $5.35-6.17 P | ||
| Americana Gloss Enamels | $2ish | $5.17 FS | ||
| Pebeo Porcelaine and Vitrea products (I had paint and outliners, markers available) | $10.59 P paint, $11.75 P outliner;$6.98 P markers | $7.60 paint;$6.30outliner;$5.95 markers | $6.29 paint;$4.87 outliner;$4.82 markers | |
| Pen-Touch metallic gold pen | $3.99 | $6.41 P | $3.49 | $2.95 |
All of these note that they will adhere to glass and ceramics. Only the Americana paint, the Folk-Art paint, and the Pebeo products require baking and promise to be dishwasher-safe. The Rainbow Markers says to “Finish with a clear sealer to make designs permanent.” All of them recommend not using on food surfaces.
As an aside, I noted that Amazon’s prices are really high. Because of free shipping or being Prime eligible (or in one case, the add-on price), it actually is cheaper than ordering online, due minimum shipping costs. Finding it in store is the cheapest option, though. These products should be available at most national (or semi-national) chain craft supply stores, some even at Wal-Mart.
 I spent some time creating a test piece. I used an inexpensive piece of wall tile purchased from the local home improvement center for around$0.50. I washed it thoroughly with Dawn dishwashing liquid, using a light scrub with a Magic Eraser to ensure that the surface was completely clean.
After it dried completely, I used each medium to write its name (clearly not using the neatest handwriting!). Note that in addition to the media listed above, I used the Silver Sharpie and a regular Sharpie, as a control from the last time. Here are my thoughts on each.
The PenTouch (by Sakura) in opaque, metallic gold is a permanent marker that adheres to glass and ceramics without baking. It doesn’t make any claims to be dishwasher safe or any other specific ceramic claims for permanence. It has a nice feel when writing and the paint flow through the tip provided extremely consistent line widths and smooth coverage (no streaks or glops).
The Sharpie oil-based medium paint marker felt like a regular Sharpie, only a little darker with a little more coverage. It claims to stick to glass and ceramic without baking, but makes no claims to be dishwasher safe. The line width can vary a little, as it has a rounded tip. It feels like a Sharpie.
The Silver Sharpie is the standard one found at any discount, office supply, or craft store. This is the exact same marker I used in the first test that fared the best of them.
The plain ol’ Sharpie is the ubiquitous Sharpie. After writing the name, I added “(x2)” and went over that a second time after I finished the rest of the tests. I got this idea from a poster who commented in my first post by leaving a video link that claimed going over it twice was one key to permanence.
At AC Moore, I found some Nicole Rainbow Markers for Ceramics in a 10 pack for $4.50. How good could those be at that price? But they met my criteria for being made for ceramics. They do not require being baked. They specifically say to cover with a clear sealer for permanence, and they are specifically not dishwasher, oven, or microwave use. But, hey, neither are Sharpies, so we’ll try them.
The products to this point are markers, which are ideal because everyone can use them easily. The remaining products tested are paints, either in a bottle or tube, although Pebeo makes a marker (which I don’t have and didn’t test).
Next up are two kinds of Pebeo paints. After drying for 24 hours, they are designed to be baked in a home oven at 300°F for 35 minutes for the Porcelaine brand, and the Vitrea line is baked for 40 minutes at 325°F. They are designed to be extremely durable, washable with many kinds of detergents, withstand scrubbing, dishwasher-safe, and even withstands the elements outdoors. The paints clean up easily with water until they have dried.
First, I tried the Pebeo Porcelaine Outliner. It’s in a little metal tube with a very fine plastic tip that can be cut to varying diameters (all very tiny). The paint is actually a bit dimensional. It can be used to outline a design, then fill in the areas with the paint product, and a cloisonne effect can be created — this is pretty cool! I didn’t test that here, trying to stick with the same kinds of designs suitable for markers. The tube is a bit trickier to use than a marker, but if you practice your design, it doesn’t take that long to become proficient. I liked the dimensional aspect, but it doesn’t work for every design. It can become bumpy and does take practice to get right.
The Pebeo Porcelaine paint is the next one. I used a very small brush to paint with. I should have gone to their website, as they have some tips on how to make lettering look good. That said, the paint flows nicely and is very workable. Both the outliner and the paint are easy to wipe off with a cotton swab or paper towel to correct mistakes. The Porcelaine paint is the opaque paint for ceramics; the Vitrea line is transparent for glass, though I’d bet that you can layer the Vitrea for some interesting effects on light colored ceramics. But choose either Vitrea or Porcelaine — the two are not mixable with each other.
I would LOVE to try these markers. I really like the quality of the paints and outliners, and would expect that the markers would be the same high quality product.
The Folk Art Enamel paints in black and metallic gold, as well as the Americana Gloss Enamel paint are water-based acrylics that look like all the other little 2 ounce bottles of acrylic paints and media that take up an entire aisle of your local craft store. Look carefully, and you’ll find these paints that cure in your oven. The Folk Art requires air drying for 1 hour, then 30 minutes at 350°F. The Americana brand says to dry for 48 hours, then 30 minutes at 325°F. Both warn not to use where it comes in direct contact with food. Both of these have a nice feel. The Americana brand seemed to have more of a gel feel to it, the Folk Art feels just like any other kind of acrylic craft paint.

Now that I have a nice test piece, I had to reconcile the directions. I let it dry for 4 days before I put it in the over. Given that the recommended temperatures and times varied, but I decided to go with the 30 minutes at 350°F. If it worked, great. If not, I’d do a separate test. Here are pictures of in the various stages of before and after the oven.
1. 2. 3.
2. 3.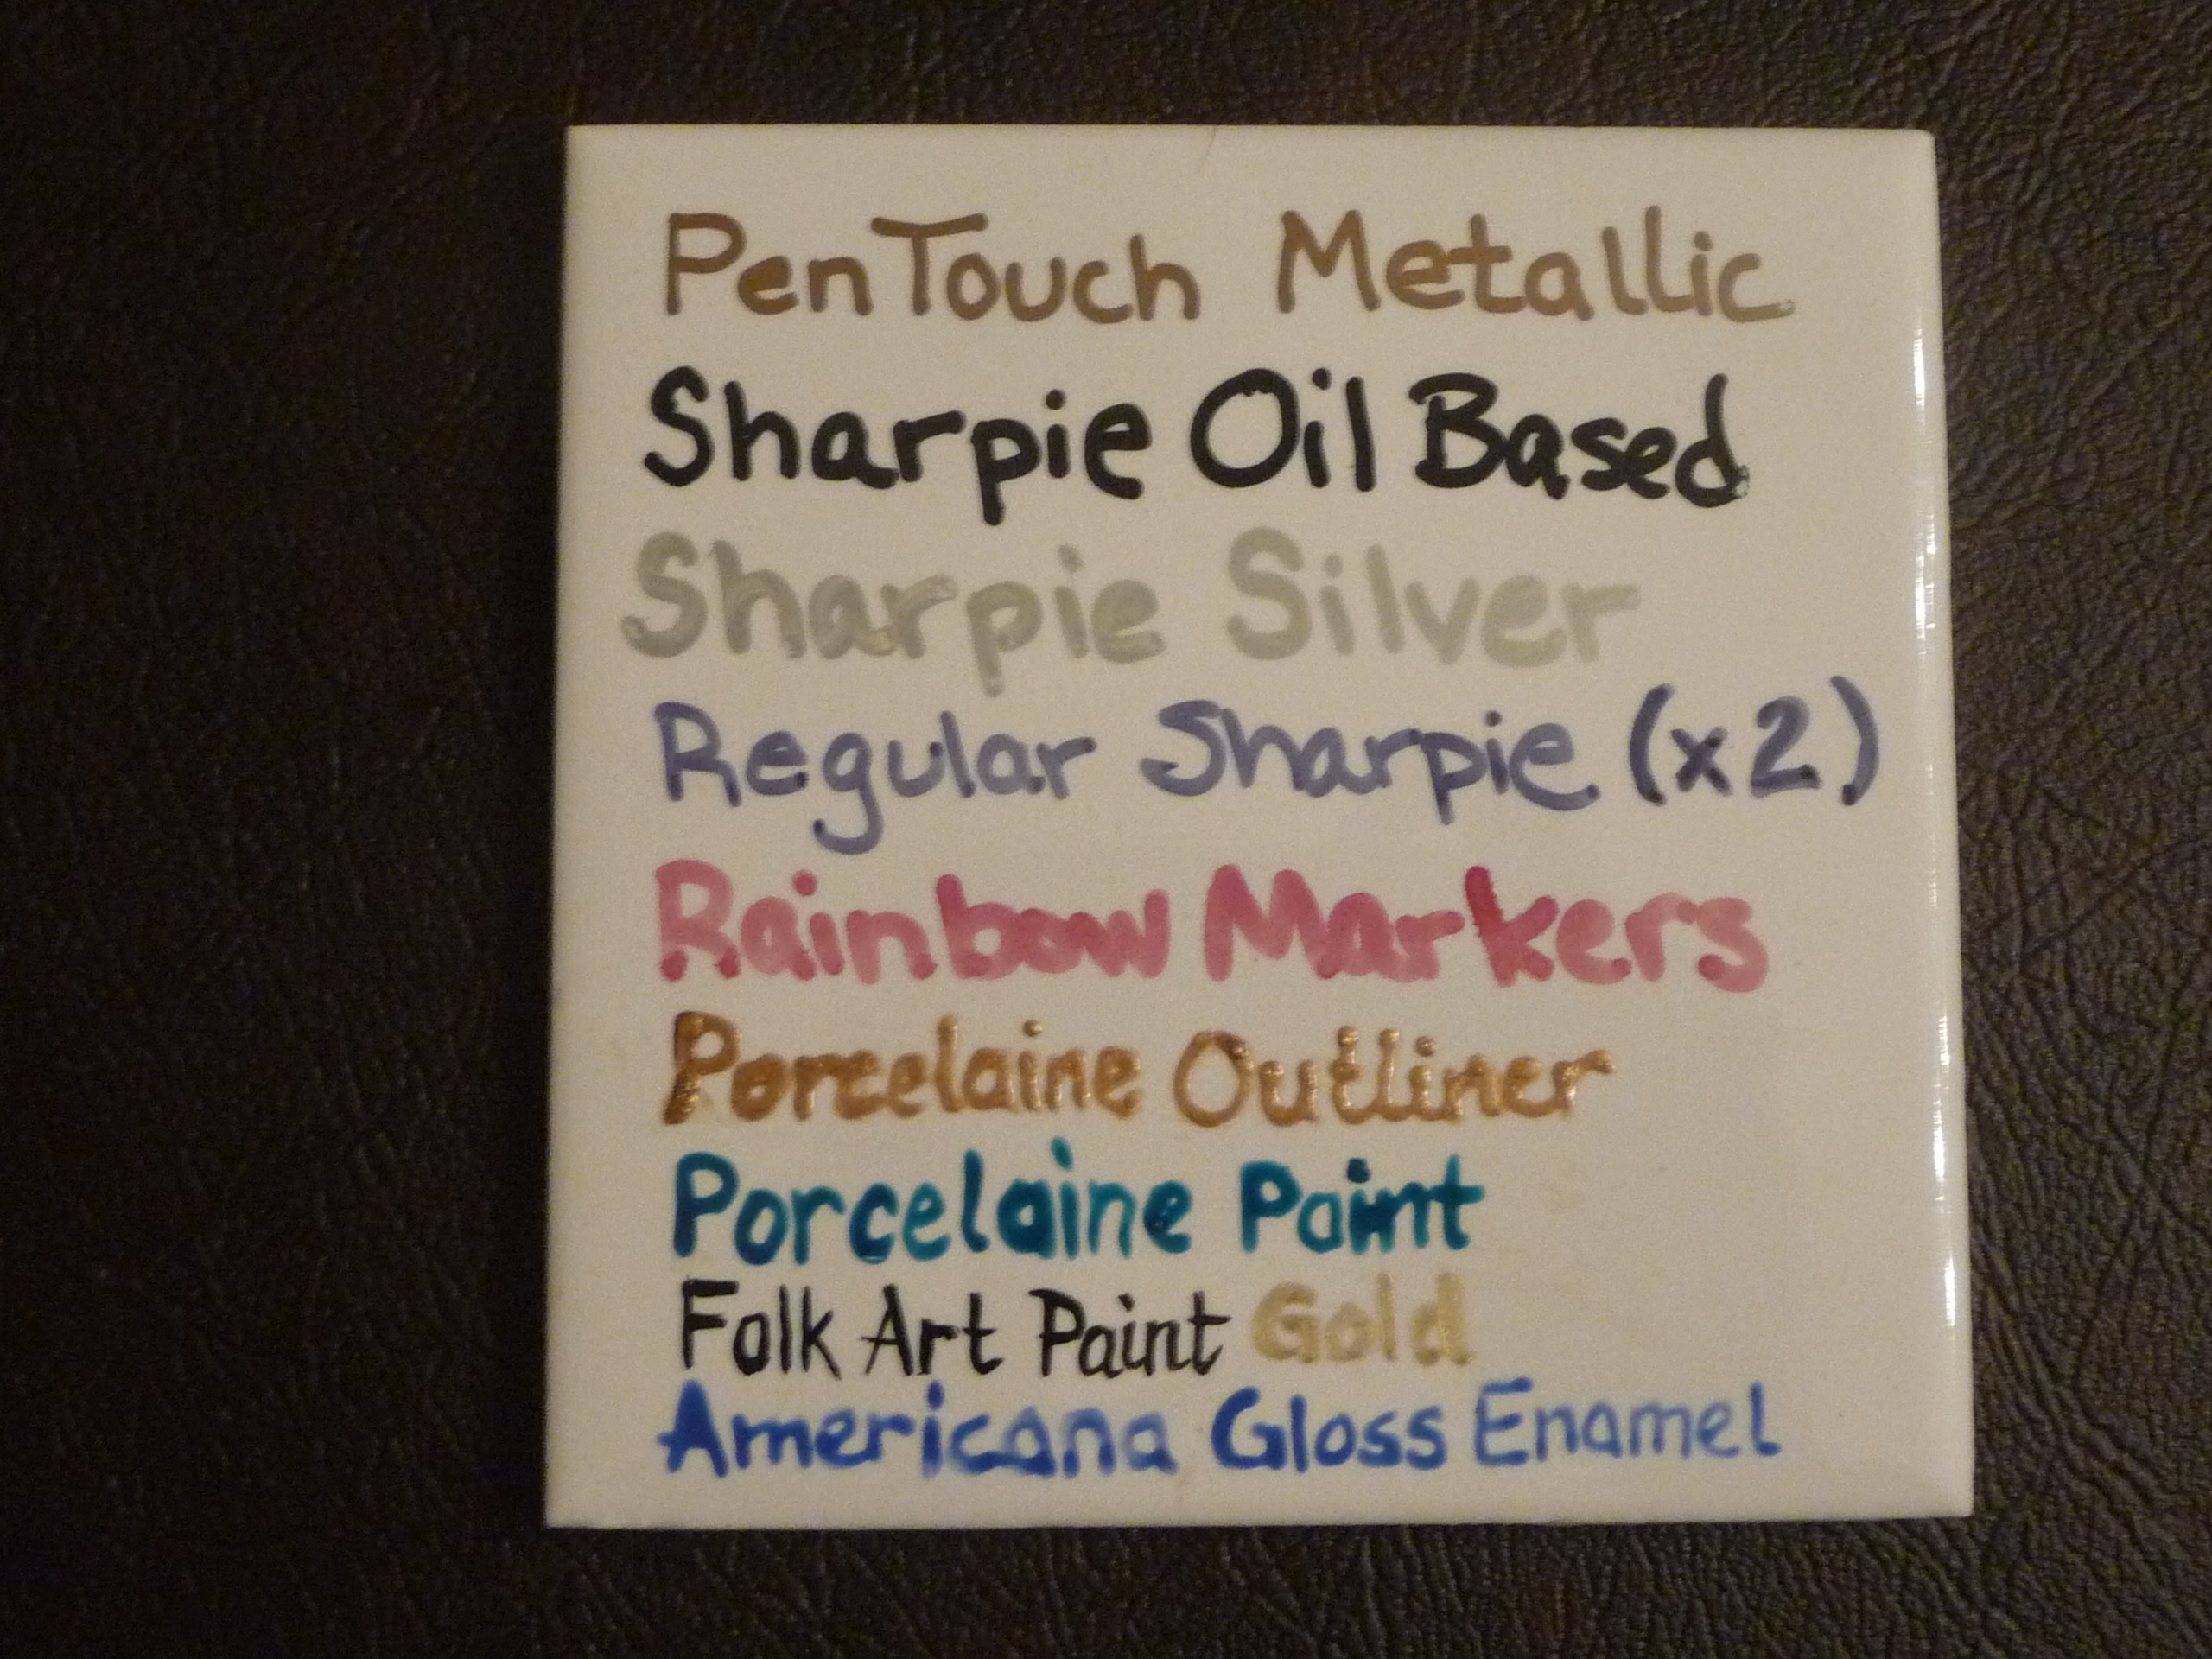
1. Just after completion, ready.
2. After drying for 4 days. No discernible color or texture change.
3. After baking. Little discernible color or texture change. The regular Sharpie and Rainbow Markers seem a bit lighter and the PenTouch metallic has a tiny, tiny halo of dark green/gray around it. You have to look pretty hard to see it, and it’s not unattractive. It’s probably because it wasn’t meant to be heated. Finally, the Porcelaine blue paint is slightly darker (though the difference isn’t as dramatic as it appears in the picture — I should really get a lightbox and take better pictures!).
So, now, what about permanence?
My first reaction was to scrape my fingernail over the last character in the name to try to scrape it off. Only two tiny flecks were dislodged, on the PenTouch metallic and the Sharpie Oil based. Below is a closeup of the damage. Not bad, since I was really trying to take the whole last letter off. The rest looked perfect.

The next step, as in the first try, I took some Dawn dishwashing liquid and a foam sponge and went over the right side of the tile 25 times, as if gently hand washing it multiple times (leaving the left side intact). The plain ol’ Sharpie didn’t fare well. To my surprise, the part where I went over it twice did fare better, but not perfect.

As in the first test, the next step was to take a worn nylon scrubbie pad and lightly scrub 25 times over the whole thing. I scrubbed as if I were rinsing dinner dishes, not as if I tried to get off dried-on food. The plain ol’ Sharpie is almost all gone; the part where I went over twice is barely there). The Rainbow Markers have significant damage, too (to be fair, they did say that to make it permanent, it needs clear sealer, which I wouldn’t want on a mug or other dinnerware).

The rest are looking pretty good, though! We need to up the ante. Let’s try an SOS pad (steel wool impregnated with soap). Same 25 times deal, with a bit of force, like trying to get some sticky food off of a plate (but not completely dried on), and only on the right side. This obliterates any remaining plain Sharpie and Rainbow Marker. The Sharpie Silver didn’t fare so well, nor the black Folk Art paint (the gold paint seemed fine). The oil-based Sharpie is worn, but not too bad; the American has one letter that didn’t seems a little worn, but otherwise it looks great. The PenTouch Metallic is a little dull, but still intact, and the Porcelain outliner and paint still look great.

Next up: rubbing alcohol. It can damage a lot of paints and markers. There was no discernible difference. I’m pretty impressed. The Silver Sharpie has lasted a bit longer than my previous trial, but it still shows wear. The oil-based Sharpie held up quite well up until the SOS pad — admittedly a very tough test! But the PenTouch Metallic, Folk Art Enamel Gold Paint, Americana Gloss Enamel, and particularly the Porcelaine outliner and paint held up well enough that I’d use them on a project. I’d recommend them (as long as you keep them away from direct contact with food or lips). And y’know, all of those are formulated for use on glass and ceramics. I think there’s something to my dad’s adage to “use the right tool for the right job.”
I’m going to take this tile and run it through the dishwasher a number of times. It’ll take me a while to put it through its paces, but I’m going to treat it like my regular dishes and send it through the dishwasher for a week or two to see how everything holds up. Watch for part III.
[Check out Part III with the successful dishwasher results, and Part IV, on whether to seal Sharpies with Mod Podge.]
Hi! This is an awesome project, and I would like to hear how the paints are holding up. Did you get to test them in the dishwasher?
Holly, yes, I have tested them in the dishwasher! I’m almost ready to write up the findings, but to give you a little preview — if they made it through to the end of the article, then yes, they held up well in the dishwasher, except the silver Sharpie. I should be writing it up within the week. Thanks for commenting, and check back soon!
What a well-done piece of research you have conducted! Your knowledge will save me money when choosing supplies for some ceramic items I want to embellish for my yard. Thank you so much for the time and trouble it took to do this.
Thank you, Julie! Glad I could help. I’d love to see the results of your projects.
Thank you your research is awesome. I am very amateur ceramicist and have been looking at products to write with on finished pieces. Thanks again
Philomena, thanks for the compliment! I hope you found something that works for your needs.
Fantastic article, thanks for putting in so much time!!
Thanks, Alison! Glad you enjoyed it.
so the one you recommend is……?
Chrys, the one I recommend depends. I really like the Pebeo products. They are the first ones I used, and have held up spectacularly well. However, don’t use the outliner if you want very flat paint. And if you want a raised edge, don’t use something that simply colors the surface. If all you want is a short-term, decorative item and need to procure the paint quickly and cheaply, use an oil-based Sharpie. Like to use paintbrushes? Use the liquid paints. Trying to make something that will withstand repeated dishwashings? Pebeo. In my opinion, there’s rarely a one-size-fits-all approach. Based on what colors you want, application method, availability of the product, and how the product will be used (decorative only or used as a food serving piece requiring washing in a dishwasher), your mileage may vary. I wish I could be more specific! IF I have to pick one, Pebeo’s my favorite, but could be more expensive and difficult to procure (you might not find it in a local store and need to order it online) than the project warrants.
Thanks, super helpfull i tried it for coasters and worked beautifully; Also found out that using a 1200 sandpaper first and baking at 450 for 45-60min increaces resistance
So glad it worked for you, David! Can I ask what medium you used? Was it regular Sharpies, oil-based Sharpies, or something else?
I used Oil-based and metallic sharpies, they look pretty much the same even after an intense wash
Thank you so much for this! I have to hand-letter on an IKEA bought matte glazed vase and am trying to find the best way to do it. I prefer a brush tip or actual brush on paint so I can get the lettering I like. I am worried about baking these vases though. I guess I’ll have to bake my test one after testing non-bake options
Thank you for your compliments, Lindsay! If the vase is a ceramic or glass vase, you don’t have to worry about baking them. Ceramics and glass generally need to get to over 950F before you can even begin to affect their structural integrity. A regular 350F oven isn’t going to change them. If you’re concerned, put it in a cold oven, bring it up to the baking temperature, then turn off the oven with about 5-10 minutes remaining on the baking time (as the oven holds heat). Then let the oven cool (crack the door just a bit to cool a little quicker if you don’t mind the heat in the kitchen!). This helps ensures that you don’t thermal shock (and break) either the piece itself or the glaze on the piece. Should be fine for pretty much any glass, ceramic, or metal item, UNLESS it expressly notes that it is not dishwasher safe. That could be due to high heat, due to water, or both — so in that case, it might be worth buying another one vase just to test it.
As far as a brush-type application, several of these items (Pebeo, Folk Art, and Americana) are paints that flow nicely. The Folk Art and Pebeo products work best for me, though Americana isn’t bad (just not my preferred viscosity).
Wow thanks for the quick response. The vase seems to be some type of clay / terracotta type vase/pot. Actually, this is the pot http://www.ikea.com/us/en/catalog/products/00186654/ if I look at the bottom I can see a clay or terracotta base peeking through between whatever is glazed over it.
I’ve always liked Folk Art brand products so i might give that a try. With the Folk Art baked paint it won’t likely need a clear coat, correct?
It’s interesting that it says it has a “lacquered” interior, though only listing earthenware and powder coating as the materials. Earthenware is absolutely no problem in a home oven; any powder coatings I know of are also indestructible in a home oven (though I’ll admit that I’m no expert in powder coatings). I wouldn’t hesitate to bake any similar vase I’ve seen in Ikea — though use your judgement.
The Folk Art paint that I used wasn’t the all-purpose acrylic paint. I used the Enamels product line that’s readily available in your local big-box craft store. This line is designed for painting on glass and ceramics and can be cured in an oven. I wouldn’t recommend a clear coat on ceramic pieces at all, as most clear coats (Mod Podge, Krylon clear spray, etc) are designed for porous surfaces like paper and wood. Put on a non-porous surface like ceramics or glass, it likely won’t adhere well causing peeling in the future as well as probably dulling the shiny glaze (or making a matte glaze shiny).
If it were me (and I were close enough to Ikea to get another one — my closest Ikea is 2.5 hours away!), I’d go ahead and try it with the Folk Art Enamels. Let me know how it goes!
Well actually, i AM a pro on powder coatings. I worked in metal machining for some time and did a lot of powder coating, so i know for CERTAIN that can withstand heat no prob. My only concern would be if the pigment (white) would yellow with heat, but I doubt it. I don’t know how i missed the fact that it said it was powder coated.
Looking at the vase the interior is just coated the same way as the exterior. I think the term “lacquered” is kind of being misused and it’s not actually lacquer but the same powder coating as the exterior.
I have a test vase so I can destroy this one and test it in the same way you did with your tile. I’ll let you know how it all turns out. Gotta make a run to the craft store first 🙂
Just a quick update on my testing. So I had the following things:
Gold / Metallic color:
Brush tip sharpie – Failed / wiped off easily / smudged
Oil based metallic Sharpie – Streaky, not brush tipped so didn’t give lettering effect I wanted
Folk Art Enamel Gold/Metallic – Not opaque AT ALL thus useless to letter with
Deco Art Metallic in Emporer’s Gold – Not opaque at all thus useless to letter with
Folk Art Enamel – Metallic Royal Gold (was different than the “metallic enamels though) – Not opaque AT ALL thus useless for lettering
Black:
Folk Art Gloss Enamel Black – pretty streaky and did not flow well for lettering but was opaque enough. Not ideal, but possible
I also tried two non-traditional paints on the glass
For the metallic I tried Brush N’ Leaf (by American Art Clay Co.) interior gold leaf paint. This stuff is the REAL DEAL. It is VERY opaque when shaken completely. Painted on smoothly for quality looking lettering. The only con to this stuff is I don’t know how well it will stand up over time. There is no info about what type of base it is and if it should be baked or not or even if it’s safe to eat off of. (i’m doing pottery but I would like to know if it can be used on plates too!) Very little info about this. Also unknown if a clear coat over will somehow effect it.
For the black I tried normal black India ink. This stuff brushed on VERY well, no strokes, and was opaque. I am not sure how it will hold up just yet. I am going to do a scratch test tonight and then bake and re-test all to see how they work after being baked.
Have you ever used india ink on ceramic / smooth surfaces?
Lindsayanng, thanks so much for posting back your experience! I’ll have to try the Brush N’Leaf paint. I’ve seen it, but never used it.
I’ve tried India ink on smooth surfaces…a zillion years ago. It was for an assignment, and I think I scraped it off to reuse the glass for another assignment (back when I was a poor college kid!). I think it would work incredibly well for painting on the backside of clear glass, then framing it, so it couldn’t scratch. But I don’t think it will be permanent at all.
Thank you for all your research. I’m getting ready to make some tiles for Relay for Life. Have you tried using paint pens? And if so, what brand? I want to be able to write on the tiles at the event so I can personalize them for people who are walking in honor of someone. And I need the tile to be ready to go without having to seal or bake.
Here is a link to a photo of the final piece.
https://instagram.com/p/3pOOFUIVBD/?taken-by=lindsayannb
How gorgeous, lindsayanng! Thanks so much for posting back. A wonderful saying beautifully executed. Well done!
Thanks.. its the Folks Art gloss black enamel and the Brush N Leaf gold leaf paint on an IKEA vase. I lettered with pencil, then went over with a liner brush (used for hand lettering) and then baked it.
The only pitfall that I wasn’t planning on was that I had to go over both the gold AND the black two times. The black was SUPER streaky
I wish I had a chance to put a little graphic underneath the lettering. There just wasn’t enough time at all.
So, if I’m understanding this correctly, you’d like to personalize ceramic tiles for people to take home at a Relay for Life event, right? So it needs to: 1) permanently adhere to the ceramic surface, 2) be easy to apply (marker or paint pen), and 3) dry quickly so they can take it quickly. Hmmm…let’s see. I can think of two things that would work. One is an oil-based paint pen. Pretty much any brand would work, though if they are labeled for ceramic or glass, even better. One drawback of oil-based paint is that it takes a bit longer to dry than water-based paint. You’ll have to test the brand to see how long it takes for it to dry.
The Pebeo Porcelaine 150 line makes markers, too. I’ve really liked this product as it has excellent ability to go through the dishwasher. According to the product’s website, if it dries for 72 hours it is suitable for decorative use with light washing. If, after 24 hours, it is baked at 300F for 35 minutes, it becomes dishwasher safe. Perhaps you can give a little slip of paper or sticker with instructions on how to bake it if they want it to be much more permanent?
Oil-based markers are available in most craft shops, so that would be easy to obtain. The Pebeo markers might be available in an artist supply store (maybe ceramic supply store, too?), or online at a variety of places (and a variety of prices! Do compare prices!).
I think I’d do a little test of the oil-based markers to see if they work with what you need, testing a few brands for opacity and how well they mark — you don’t want them skipping, leaving blobs, dripping, or thin or streaky. Depending on how much time you have between now and the event, I’d try a Pebeo marker if you can get it to add to your test. I’d love to know what you decide on and how it turns out!
This was very well done! I am so excited that now I can keep a memento of the convention I’m going to that will last! Thanks for your amazing help!
Can anyone tell me if they have tried Edding Porcelain Pens? Much appreciated x
i love your test! May i ask what is the best gold metallic paint you discover so far to paint on glazed ceramics? I used martha stewart and dazzling’s metallic colours but they are easy to be peeled off with my finger nails. Applying them on unglazed ceramics are oke but they are definitely not shining.
Yu Chan, I’ve tried two. One is the Pen-Touch metallic gold pen. It worked well enough for decorative pieces and pieces that won’t go through the dishwasher, only because it develops a bit of a color shift in the dishwasher (not horrible, but definitely duller). I also tried the Pebeo Porcelaine 150 outliner in gold — that does remarkably well in the dishwasher. The difference between the two is that the Pebeo has a dimensional quality to it. Other than those two products, I don’t have any other first-hand information. I’d look for a product that is made for glass, china, or glazed ceramics, particularly if it mentions that it’s dishwasher safe. If a product isn’t specifically stated that it’s for ceramics, I’d probably look for an oil-based formula. Most general-purpose water-based products don’t adhere well to ceramics. Hope this helps you! If you find something, let us know what you used that worked!
For those of you that are interested, I’ve done another test sealing both glass and ceramics with Mod Podge. Check it out here: https://dsmartin.wordpress.com/2015/10/07/sharpies-on-ceramics-part-iv/
Hi, I am working on a series of hand painted tiles. The tiles I used plain shop bought glazed ceramic tiles.The medium I am using is Sharpie.I would like to ask how to seal them permanently. I need to pack them and send them and stand up to being handled. Thank you for any advice.
Barbara,
Are you using the regular Sharpies or the oil-based paint Sharpies? If you’re using oil-based Sharpies, I don’t think you need to seal them. If you’re using regular Sharpies, I’m not sure there is anything you can do to seal them permanently AND have it still look like ceramics. You can certainly try a number of sealants, but most will show brush marks, have bubbles, or can even wrinkle the texture of the Sharpies. Most sealants are designed for porous surfaces (like wood). They don’t stick well to non-porous ceramics. You might try a resin — I’ve never done it but that might be one of the few that could hold. I don’t know how it would look or hold up, though.
Regular Sharpies just aren’t the right medium for permanently decorating ceramics, unfortunately. I wish I had better news for you.
Wonderful article. Thank you so much. I will take the results to the store and save at the bank!
Thanks, Jodi! Enjoy your new supplies on your project!
Wonderful research, thank you! I’m planning to decorate tiles which will be set into the top of a coffee table … I’m expecting to have to apply a sealer as a final stage. Any suggestions? I need a fine tipped pen to get the desired result, I can bake each tile before grouting and sealing. I’m finding the project a bit daunting while being quite excited and enthusiastic at the same time! You sound like a “go-to” person for some courage!!
Marion, thank you for your kind comments! I hope I’ve given you some courage — this isn’t difficult at all! If you’re game for tiling and grouting a coffee table, the tiles are the easy part!
That said…please don’t attempt to seal tiles! It doesn’t look good. See Part IV of my series. The beauty of ceramic tile is its durable, non-porous finish; putting a sealant on that will change the look. Even if it looks good when you finish, I’d be afraid of it eventually peeling. Why? Sealants are for porous items (like wood, concrete, and terracotta) and need the tiny little pores to grab onto. Glazed tile has no pores, so general-purpose sealants will rest on top of the tile until something — a scratch, a bit of moisture, or just time — causes it to separate and peel. So don’t seal the tile. Seal the grout, though. That’s porous.
So what to do about decorating? I’d get the Pebeo pens. Yes, I’m a huge fan of Pebeo products! I’ve never received any free products from them or have any connection with the company. But I’ve got lots of little projects that look GREAT after daily use for years. You won’t need to seal the Pebeo products! They will likely stand up to grouting, too.
Grouting brings a special set of considerations. When you spread the grout over the tiles, you are effectively sanding the tiles. The product you use to decorate the tile needs to hold up to grouting (and if it holds up to that, it’ll hold up to wear and tear). The Pebeo products I used will definitely hold up, and any other products that passed the steel wool test should hold up, too (without sealant!). I’d do a test. Get an extra tile and decorate it with a sample design. Follow the product directions to cure it (dry time, baking, etc.). Then take the grout you plan to use and use the tools to spread grout over the top of the design. Treat it just like you’d grout it in the coffee table (but grout it to a piece of cardboard or something). Let the grout dry. You’re looking to make sure the design isn’t sanded off or there isn’t a chemical reaction between the grout and the design. I’d rather have you take an extra day to test this than to have you spend hours getting your design just right, only to find that the grout doesn’t play nicely with all your hard work! If the test works, you’re going to have a gorgeous heirloom!
OK…that sounds like a lot of cautions! But, if you channel your enthusiasm and excitement into a short test product, you’ll find boundless courage! Go for it! What’s there to lose? Keep us posted here, and post a pic or two of your test project and final project. Good luck!
Thanks so much for the extra information and advice! I’ll definitely hunt down the Pebeo pens and have some fun from there. Tiling etc doesn’t faze me, I’ve done plenty of that in more conventional settings! I’ll send you photos when it’s done.
Here’s a link to a site: http://www.markersupply.com/pepama.html. It’ll take you right to the Pebeo page. When I ordered some pens around Christmas last year, they had the best prices and it didn’t take long to get them. I have no ties to them, other than to pass along that I had a good experience with one order. Hope this helps!
What about one of the markers on Powder Coating? Is there one better than the other?
Hmmm…I haven’t tried to decorate powdercoated items! It’s my understanding that the powder coating is a polymer finish. The media that I’ve discussed in this post are for ceramic or glass items. I don’t know if there will be any unusual bonding issues using a product designed for ceramics on a polymer finish. My *guess* is that they’d work fine, though most everything I can think of that is powder coated may be too large for a home oven (I’m thinking things like bicycle frames). If you can cure them properly, these products may work. However, since the powder coated finish is a polymer, perhaps media geared for plastics or polymers might adhere better and may not need heat curing.
I just found your original post and it was wonderful to read. What an excellent project for you to do and more importantly to share in such great detail. I have only begun exploring my creative side recently (semi retirement lets you do that) and I have so many questions about supples, mediums and materials. Thanks for taking the time to share this information. Can’t wait to try some of my ideas out now that you have helped me understand how these products will work.
Thank you so much for the compliments, Elayne! I’m glad my post helped out. I wish you many long and happy retirement as you explore your creative side. 🙂
Yassss this is what I have been looking for. Every tutorial has different directions, uses different products, bakes for different times, and appears to be a paid promotion for a different marker claiming to be able to survive the dishwasher!! I was about to try and do this myself– so glad I found your post. xoxo
Ruth, I’m so glad I could help! Good luck on your project. 🙂
I’m just curious, would the sharpie still work a little better if you were to use a spray sealant? I want to make coasters (those using mod podge and a spray to help the picture and coaster withstand water) and at the bottom I want to write the last name of those I’m giving the coaster to. I would bake the sharpie on before finishing the project, so would the spray help in the end? even a little?
Brittany, I’d love to tell you that using a sealant would help, but it won’t. Part of the beauty of painting on ceramics or glass is the beautiful glazed finish. There are no sealants that will give you a finish like a ceramic glaze. Worse, there are few sealants that will even adhere well to the ceramics as most sealants are designed for porous materials.
See my blog post #4 for the reasons why I don’t recommend sealants at all.
What do I recommend? Don’t use Sharpies. Use a product designed for use on ceramics. The Pebeo products I’ve used have been spectacular! They bake like Sharpies and are extremely permanent and dishwasher safe. They even stand up to steel wool. Why a test with steel wool? It replicates years of bumping and knocking quite well, and there’s always that well meaning “helper” that doesn’t know how to care for it. I have pieces I’ve decorated with Pebeo products that have been in near-daily use for over a decade. You can get Pebeo markers from Amazon Prime for $7, or for about $4 each from markersupply.com. Your local Michael’s or AC Moore may have them…look in the locked cabinet by the fine art supplies and air brush paints. Added benefit: use coupons! They aren’t THAT much more expensive than oil-based Sharpies (which do work better than regular Sharpies). Get the right tool for the right job. I’d hate for your gorgeous, hard work to be washed down the drain!
Good luck!
Thank you, thsnk you, thank you, for doing these tests. This is exactly the kind of research I was loking for, as I am about to venture into selling plates & tiles. I, like a lot of us, have boxes full of our old faithful regular sharpies, but I just new it wasn’t standing the test of time. I lije the idea of protecting the plates with some sort of clear sealant- but which one? I will continue reading Part II and Part Iii. Thanks again!
I loved your test, saved me a lot of money, time and frustration. Thank U very much.
So glad I could save from frustration! Comments like yours make my day! THANKS!
I was wondering if you have any ideas as to what I could use on a student bathroom tiles? I was to write quotes on the walls in our school bathrooms and was wondering what you think would be the best thing to use that would be “kid” resistant? Something they wouldn’t be able to chip or rub off? Thanks sooooo much!! 🙂
My favorite product is the Pebeo paint. I’ve got a few things I painted over a decade ago, like my various oil bottle that I use daily in the kitchen. I knock them over and torture them, and they don’t look worn. It’s an amazing product! I’m assuming the tiles are already in place, right? That means you can’t cure them in the oven, but if I remember correctly, drying for 30 days has the same effect. Maybe that is good for the beginning of summer break?
My fear, though, is that a determined student will be able to chip or scratch off most anything short of high temperature kiln glazing (and even then…). I’m sure that with a scissors, table knife, or other item that might be found in a backpack, I could probably remove the design, though I’d REALLY have to be determined. What I might do is use the Pebeo paints (bonus: lively, bright colors!), then cover them with a sheet of plexiglass for several months to the end of the school year. Alternatives to Pebeo would be any oil-based enamel; again, it has to dry/cure for quite a while (think weeks to months, not days) before it’s as permanent as it’s going to get.
What I might do instead, is see if there’s a way to paint a panel and affix the panel to the wall. If it gets destroyed, it’s easy to put up a new panel rather than repair the tile (which could include chiseling out the tile). Additionally, quotes can be swapped out. Five years from now, whatever quotes you put up might need to be updated. You might try any surface that you can put a thick coat of acrylic sealant over the design. That would make it waterproof, easy to clean, and easy to change if damaged or outdated.
Hope this helps!
Thank you so much for your experiment! I have a question about non-glazed tiles. How would I approach coloring the tile a solid color and then decorating or drawing in black on top of it? Should I bake the tile after the first round and then follow with the second? Thank you!
In my opinion, you should be using a color glaze to color the tile a solid color first and then use whatever method you want to put designs on it. As far as whether to glaze, bake, then paint and bake again, that would depend on what your design is and what you plan on using to get the design on to the solid-colored tile.
Jenk, the answer is, “it depends.” What products are you using? For any of the ones that I’ve used, I’d let each color dry in between, then bake it once. The only time I’d bake in between (particularly with Pebeo) is if there is some possibility that I’d need to “erase” the top design, as in adding writing on top, then recognizing I have a spelling error. It will be easier to wipe off without destroying the undercoat.
Another issue that you raise is that you are working on unglazed tile. Unglazed tile is far more porous, meaning it will accept a lot of paints that glazed tile cannot. None of these products will definitely make the unglazed tile look glazed. However, if you’re looking for a matte or painted finish, you can use nearly any acrylic or oil-based paint. Oil-based will likely be more durable, especially if water or weather is involved.
I hope this helps!
Thank you so much!!!
What would be the process for unglazed items with little to no need for dishwasher, microwave? I want to do take home ornaments for a children’s Christmas party. They need to dry fast and be pretty on Grandmother’s tree.
For unglazed, decorative items, you have a lot of options. For children’s ornaments, I’d probably do washable markers. The unglazed ceramics are porous (like wood and paper) and will absorb the marker. (So will the children’s hands, which is why I’d say washable marker.) To make sure that they last in Grandma’s collection, I’d put a clear spray sealant on them so that the water-based pigments won’t rub off on other ornaments. If the children are older, Sharpies or acrylic paints work well, too. No need for a sealant as Sharpies and paints are permanent. Sounds like a fun project!
Thanks so much for your response. I am hoping for a fun project.
Are any of the good ones not initially permanent, in case I mess it up?
Yes, Kia, many of the good ones need to dry, so they can be wiped off with a damp cloth, or smaller mistakes can be removed with a cotton swab before they dry. Even when dry (and before curing in the oven) on a glazed surface, many can be removed with a razor blade or steel wool.
I question might seemed strange,but whats the point of decorating a plate or mug if you cant use it? AKA “The Giving Plate”,a birthday plate,a tea mug etc.?
Not a strange question at all. I started this experiment because I was seeing so many people create beautiful and elaborate designs on mugs and plates with Sharpies, happily noting that it would be dishwasher safe. Not only will the design wash away (with regular Sharpies; oil-based Sharpies will work, but don’t need baking), if it’s decorated in an area that touches your lips or food, you might get flecks of Sharpie in your food — gross, but probably harmless. Just because it’s non-toxic doesn’t mean I want to eat it, knowingly or unknowingly.
I had worked with the Pebeo products prior to the explosion of Sharpie-on-ceramics posts on Pinterest. I knew they worked great and were quite dishwasher safe (still, only for the non-food surfaces, even though it’s non-toxic). If those people had just used a product that is made for the materials, they’d have a beautiful piece!
To answer your question, some people adore decorative pieces. Other people are more utilitarian. I’m in between, I like decorative pieces, but I’d also like them to be useful. To each his/her own, I guess. But if it’s going to be decorative, I’d like it to withstand washing. And if someone says it’s dishwasher safe, then it ought to be (and regular Sharpies just aren’t). If you’re going to spend lots of time and effort on a beautiful design, you should spend a few minutes getting the paints and media that will provide the best results, IMHO. I’d hate to give a Giving Plate that becomes a regular plate after the first wash. (Why give a giving plate? Sorry, I can’t answer that one. That’s not my particular style.)