
“It seems like regardless of what I do, I can’t get my print sized right! HELP!” I see this question asked a lot. It’s usually followed with, “I need step-by-step instructions!” The good news is that its usually easily solvable! The not-so-good news is that step-by-step instructions depend on the computer, the software, and the printer you are using. That’s not all bad, though! There are some universal things you can check. Let’s go over what settings in the software and your printer change the print size, then afterward, I’ll add some links to step-by-step instructions for some of the more popular programs (coming soon).
Selecting the Software
Let’s start with the software. You should be printing from a program/app. Right-clicking in the File Explorer (Windows) or Finder (Mac) is not using a program.
Why isn’t the File Explorer or Finder a good option? Well, it is if you have a document or you want to print a photo for a frame. This is the easy way to print images and because it’s easy, the printing process is going to make a lot of assumptions for you. The first assumption is that you want to print it at one of the standard photo printing sizes, like 8×10, 5×7, 4×6, or you want it to fill the page. You can tell it to fit the frame (shows the entire image) or not (enlarges it so the smaller side fits and the longer side is cropped off — not ideal!). That’s about the extent of the sizing options, regardless of the dpi or size set in Canva. Using this method, your chances of getting it sized right are not good! You need to pull your image into a program that allows you to resize it and print it.
What software can you use that does that? Almost all software written for a computer can print. The list of what not to use is pretty short!
- Canva, Krita, and similar graphics programs that are designed to run in browsers to create graphics primarily for digital use (like social media posts). If you’re making them for digital use, there’s not really a need to print. You can still use these programs to design your image, just save them in an appropriate format (.PNG, .SVG, or .PDF, to name a few) and print them from another program.
- Your browser, for the same reasons as the File Explorer/Finder program.
- Cricut Design Space. If you’re doing Print-Then-Cut projects, like stickers and cards, you definitely need to use it! However, if you’re printing for sublimation or another crafty reason that does not include that requires precision cutting, this is not the program to use. Why? It needs to print the registration marks that the Cricut machine uses to align the cutting head to the print, and that takes quite a bit of space on the paper, so it limits the maximum image size to about 6×9″. Additionally, there have been bugs that cause intermittent print quality and color issues. And it prints at a lower resolution (150dpi), but honestly, that’s fine for many applications. The maximum print size is the limiting factor. This program is geared towards cutting vinyl, paper, and other media and it does that well. Printing is secondary and limited. Use another program for dedicated printing.
So that leaves a lot of programs that can print your images! Pick one and go with it. If you need some help choosing one, see What Software Can I Use for Sublimation? The good news is that most programs work great if you can get the settings right and the settings are similar across programs. The bad news is that everybody calls the settings something different and some have more settings than others.
Software Settings
The software has a variety of settings so it can determine how to display your image (or document) on the appropriate size paper. There are two sizes that are easy to confuse:
- The size of the physical piece of paper that you’ll put into the printer, usually called Paper, Page, or Document size, indicated below by the red, dashed line
- The size that the image will print on the piece of paper, usually called Image or Picture size, indicated by the thick blue line around the mountain scene
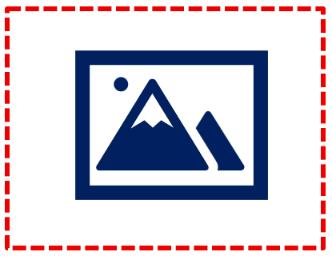
The paper size is the physical piece of paper shown by the red, dashed line; the image size is the size that the blue image will print on the page
Setting the Size of the Piece of Paper on Which to Print
The paper size refers to the size of the physical paper that’s in the printer on which you’ll print the image. Typically, the setting is called some variation of Size. In a word processing program (Word, Pages, LibreOffice, Open Office, Google Docs, etc.), it’s usually in a Layout or Page Layout menu. In a graphics program, it might be under Page Setup or Document Properties. This setting needs to match the paper that is in your printer.
Setting up the Page to Accept the Image
Once you have the paper size set, in most programs, you can see the paper on the screen. You’ll insert the image, then set the image size on the page, which needs to be smaller than the paper size. Before you insert the image, it’s easiest to prepare your page to accept the proper size and orientation of the image. If you’ve already inserted the image, that’s perfectly fine; change the following settings before trying to resize your image, as these settings can limit the maximum size of the image and it’s frustrating to remember this when the software prevents you from resizing the image to a size that fits on the page!
First, check to see if your software has margin settings. Word processing programs and some graphics programs use margins (GIMP does, Inkscape doesn’t). When you’re printing only images, set these to your bare minimum that the printer supports. For Epson EcoTanks, use 0.12″ on all margins. If your model supports borderless printing for the selected paper size and you need the extra 0.12″ on each side to fit in your image, use 0.
A second setting is the orientation of the paper, either portrait or landscape. Portrait is taller than it is wide, like a school portrait photo. Landscape is wider than it is tall. Choose the option that suits your image (though you can also rotate your image). Find this settings with the settings for paper size and margins.
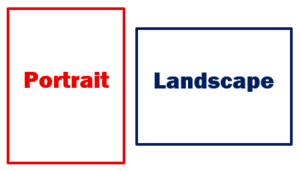
Set the paper size, the margins, and orientation when you open your software, before you insert your document. Even better, find out how to make these the defaults for your software program so you don’t have to remember to do it every time! Search the Help instructions for “changing the defaults” or “change paper size” or similar wording.
Inserting the Image
For word processing software, look for an Insert Image, Insert Pictures, or similar function in your software. For graphics programs, look for Open, Import, Insert, or similar wording. The software brings up a dialog box where you can select the file from wherever it’s stored on your computer, then inserts it.
There are at least two other ways of inserting an image:
- Use cut-and-paste. When you’re viewing your image in a different program or in the File Explorer/Filer preview, right-click on the image and select Copy (or press Ctrl+C in Windows), then switch to your program where you want it and find the Paste command, usually found under the File, Home, or Edit menus (or press Ctrl+V in Windows).
- Use drag-and-drop. View the file in File Explorer/Filer and click-and-hold on the filename, then drag it to the program where you want it, then release the click.
Nearly all programs support all three methods. All of them will give you the same results; none are preferred over the other nor make any difference to the final quality. It’s all the same to the program; these are just options presented to the user.
Resizing the Image
Each program has their own way of sizing the image. It’s one of these methods:
- Calculates size from dpi or other metadata. In the metadata (hidden data) of your image, there’s a number called dpi, or dots per inch. This tells the program how big this should be by taking the number of pixels (dots) and dividing it by the dpi to come up with how many inches for the size. If your image is 900×1200 pixels at 300 dpi, it calculates 900/300 = 3″ by 1200/300 = 4″ (this is a small pixel count but easier to calculate than the 2000+ pixels that are most commonly used for purchased images). Most desktop programs ignore this, however (if you’re sending it to a commercial printer, you definitely need to have the dpi set properly for their software!) Why do they ignore it? When printing an image, 300 dpi is standard. For displaying an image on a screen, 96 and 72 dpi are standard, as pixels on your screen are larger than the dots that can be printed. Most users don’t need to be aware of this distinction and want to use images that are created at any dpi in their design. The software looks solely at the pixel count and ignores the dpi, taking up one of the other options. If you’re using a PDF or SVG which don’t have pixels, there is other metadata stored that tells it the size. PDFs are the most reliable, as the PDF format is designed for page layout, so that 3.482″x9.723″ image will always print at that exact size. SVG is a format that is made of vectors (mathematical equations) and infinitely scalable; again, it can be used for display, printing, or other uses, so the metadata in the file may or may not be used by the program.
- Uses its own calculation. If it sees a pixel count of, say, 2000 pixels wide, it’ll assume some number of dpi and figure it out. It could be anywhere between 2″ to over 100″, depending on the program. Same with vector formats like SVGs. After you use the program a number of times, you’ll get used to how it works. (Sad but true.)
- Constrains its calculation with how the margins are set. If you are able to set margins in the software, it’s likely it chooses this method. It may use metadata or it may use its own internal calculations, but if that calculated size exceeds the margins, it will resize it to fit between the margins.
In other words, it’s extremely likely that you need to check the exact size of the image. Once the image is in the program, click on it to select it. Somewhere in the menus, or perhaps up on the toolbar in a graphics program, will be the ability to type in the exact size.
Sublimation tip: If the image is to cover the entire surface of the blank (like a slate or a bookmark), make the image about 0.15″/2mm larger than the size of the blank. If it’s slightly larger, it’s easier to center on the blank and there is a much greater chance that you will not have white lines on any of the sides because it wasn’t lined up properly.
Always measure each blank as there can be variances between brands, in batches from the same manufacturer, and sometimes between individual products! Measure twice, cut…er…print and press once.
Aspect Ratio, or Don’t Distort your Image
Most software allows you to type in the exact size you’d like or you can use the “handles” or little dots or squares to drag it to the size you want. You need to keep the aspect ratio, or the ratio of the short sides to the long sides, the same in order to keep from stretching, squishing, or otherwise distorting your image. The aspect ratio defines the rectangular shape of the image, which you want to keep the same.
Most of the time, software has a button with a lock image that locks the aspect ratio so you cannot change the shape. You want it locked when resizing images! You have a 5×7″ blank, like an acrylic block, slate, or aluminum sheet. You have a square image that you want to put on the blank. Shown below are three ways to do this:

- The image on the left fits the square dandelion image into the smaller dimension while keeping the aspect ratio the same (still a square). The image fits, but there’s excess space along the sides. (Fix this by putting a rectangle of color underneath it in the same size as the blank. With a solid color, it’s easy to use an eyedropper tool to sample the color and make it the same. If it’s a photo, use a contrasting color or pattern, and/or use the area to put a name or other customization.)
- The center image fits the square dandelion image to the larger dimension while keeping the aspect ratio the same (still a square). The image is now too large and is cut off at the top and bottom, when centered. (There is a possible fix. Depending on your image, you might be able to move it up or down a bit to get the important parts of the image on the blank; in this case, move it down and cut off part of the stem and it may work well. Some images, like a company logo, can’t lose any of the image, so you’re left with the first option.
- The image on the right changes the aspect ratio from a square to a rectangle that fits in the 5×7 frame. You can see that the image is squished from top to bottom. Most designs cannot withstand the squishing without looking strange — but some, like the dandelion in the example, look pretty good if you didn’t know the dandelion was supposed to be perfectly round instead of a windblown oval.
Logos, photos, and most images do not look good when the aspect ratio changes. Use the aspect ratio lock. To change the size and shape of solid or filled shapes, you may or may not want to change the aspect ratio, as this is how to change a circle to an oval and a square to a rectangle, among other shape changes.
White Space Around the Image Counts
Sometimes there are borders around the image. Take a look at the image below. The black border shows the extent of the image. The tube of yellow paint is on a green background with a wide border of white all the way around. Let’s say the inner, green square measures 5″ while the outer square measures 7″. The blank that it’s going on is 8″ square. If the image is enlarged to 8″, that would make the green square about 5.7″ square, leaving a 1.15″ white border around the blank.
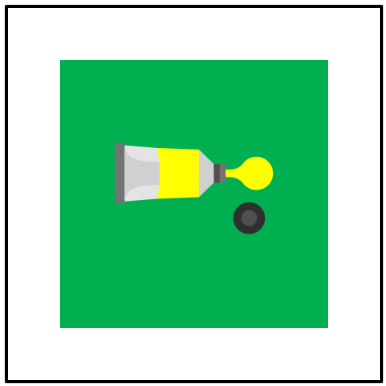
That white border may be what you want. But if that’s not what you want and your image is printing too small, you’ll need to look at how to crop the image to remove the excess white area. Without the white area, resizing it to 8″ should get you what you the proper size (if the blank measures exactly 8″, remember to size to 8.15″ so you can visually center the blank on the image and don’t get white streaks on the side).
Checking the Printer Driver Settings
At this point, your image is ready to print in your software. (Now would be a good time to save it, if you haven’t already!) It’s time to tell it to print (usually File -> Print or press Ctrl+P in Windows.) In Windows, this brings up the one of several print dialogs where you can set the most commonly used settings. Macs will work similarly. Eventually, it will bring up a printer driver dialog box to set more settings. As you can see, there are lots of places to change things and it’s amazing how these things can change even buried deep in different screens.
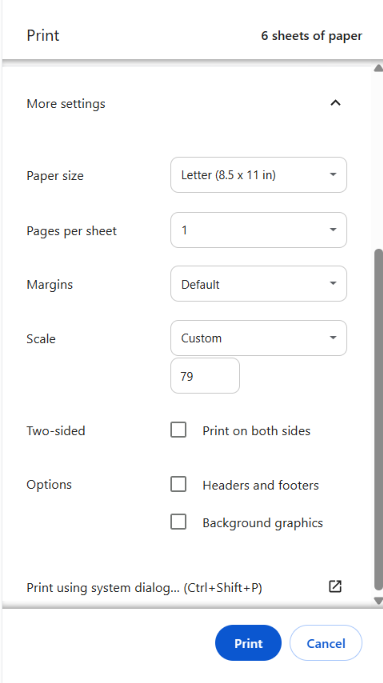
A screen with the right side looking much like this may pop up. (Or it may look like the next one, or it could look completely different, depending on the software used.) If it’s different, move to the next image.
If one side of the screen or the other looks similar to this dialog, scroll down and click the More settings button and options similar to these should appear. The things to look at are:
Page Size: This is the size of the paper in the printer. It is not the size that you want the image printed.
Pages per sheet: This should be 1. (Choosing more per page will make them smaller.)
Margins: Leave this at default. Changing them can change the size of the image.
Scale: This should be Default! Note how this says Custom with a 79 below it? That’s going to print the image at 79% — this is where the error is! Fix that!
If everything is appropriate, you can click on Print using system dialog. (If you usually press Ctrl+P to print, using Ctrl+Shift+P will get to that next screen without this one in the way.
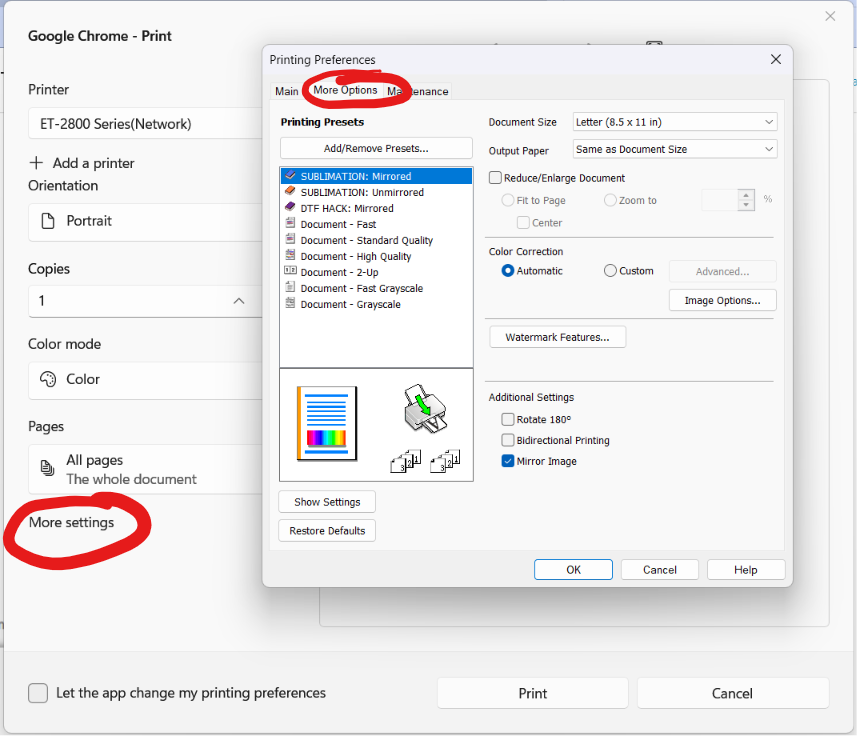
This is the system dialog. To get to the printer settings, click on More settings to pull up the window that is over the system dialog.
On this screen, the settings that can change the size are on the More Options tab. Check these settings:
Document Size: This is the size that you have set in your software, which should also be the size of the paper in the printer.
Output Paper: It should be Same as Document Size.
Reduce/Enlarge Document: This should be unchecked. Changing this will enlarge or reduce the document size.
Then press OK to close the dialog, then Print to print your document.
Printing a PDF from Adobe Reader
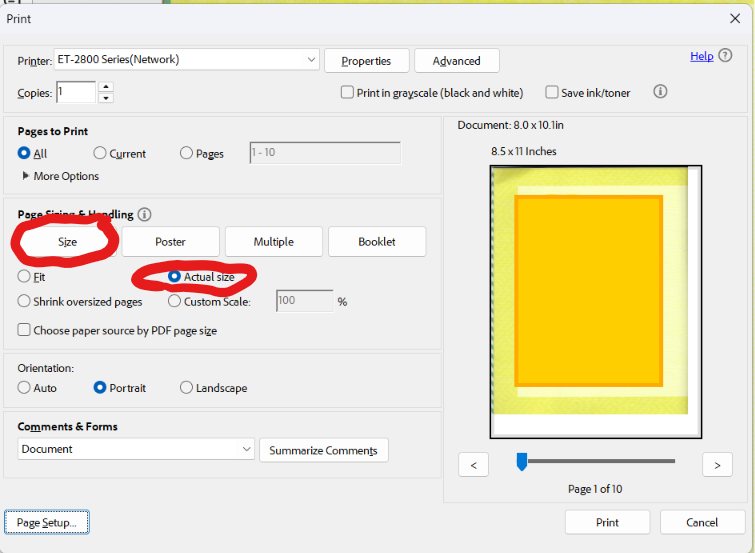
This brings up a different screen. On this screen, look at these options:
Size: Click on the Size button which may change the options beneath it.
Actual Size: Select Actual Size. Any other option will enlarge or reduce the size from what you specified in your software.
Properties: Click this button on the top row to pull up the printer settings dialog box, as shown in the options in the system dialogs screen explanation, just above.
General Summary
There are many places to look to get your image sized properly on the page. To recap:
- Selecting Software
- Software Settings
- Setting the Paper Size of the physical paper to print on
- Setting up the Page, Margins and Orientation
- Inserting the Image
- Resizing the Image
- Aspect Ratio can distort the image
- Take into account the White Space
- Printer Settings
By following all these steps, I hope you’ve found your solution! If not, drop me a note in the comments and I can see if I can help you.
Links to Step-by-Step Instructions for Popular Software Programs
Coming soon!