This is the third in a series of projects to learn to use the features of Cricut Design Space. These projects create something that likely everyone can use: gift tags! They are small, quick projects designed to be useful and use inexpensive cardstock to learn how to use Design Space.
This lesson shows you how to save your work and be able to find your projects again to make them over and over (not that you’d want several squares or rectangles, but future projects will be more involved!) At the end, there’s a challenge to cut three more shapes out of one piece of cardstock to reinforce what you’ve learned in lessons 1-3.
| Skills Covered | Materials Needed |
|
|
Saving Your Project
A project is what’s on a Design Space Canvas screen — in other words, the square or rectangle that we’ve worked on in Lessons 1 and 2.
If you have worked through these lessons without stopping, you might have the rectangle still on your screen. If you’re thoroughly comfortable with placing a shape, feel free to start from here. If not, I strongly recommend repeating Lesson 1 and/or Lesson 2 just to be sure you’re comfortable with the process.
Get to a point where you have the square or rectangle gift tag on your Canvas screen.

On the Header bar at the top of the screen, find the Save button. In a browser, it will say “Save.” In the Android version, look for the floppy disk icon ![]() .
.


Note that on the Windows/browser version, the Header has “Untitled*” in the middle. This is the project name (also called file name). The asterisk at the end is the “dirty file indicator.” No…it’s not mature content! It’s simply saying that you haven’t cleaned up after yourself and saved it.
➀Press Save, and since your project hasn’t been saved before, a dialog comes up to save your project, shown below. If you have previously saved your project, this dialog does not appear as it saves it with the same name.
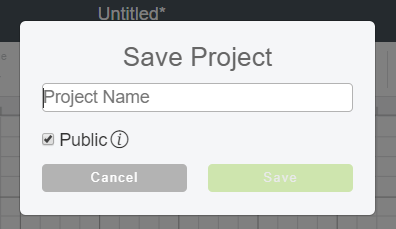

➁ Type in the name of your project. Try to be a bit specific. “Gift tag” probably will be too general if you’re looking at making a series of gift tags. Maybe “Lesson 3 rectangle gift tag” might work better.
The Windows/browser version has a checkbox for Public. This allows anyone with the specific link to access your project. It will NOT make it freely available for anyone to find through a search unless you post the link in a public area (you need to do a lot more to add projects to the Cricut community). For now, it won’t matter whether it’s checked or not. An upcoming topic will discuss the Public checkbox in detail. This option is not available on the Android app.
➂Press the green Save button. You’ll see a confirmation message that your project has been saved. Windows shows at the top of the screen, Android shows unobtrusively on the bottom (in other words, you might miss it!).
Where Is My Project?
Your project is stored in the My Projects section, in the “cloud” on Cricut’s servers. You can find your project anywhere you find projects, such as on the Home screen, the Projects button in the Canvas menu in a browser, or the My Projects button in the Header in a browser.
There are several ways to find the Projects screen. It depends on where you are and what you’re doing. Select browser or Android instructions.
Using Design Space in a Browser
- On the Home screen (☰ Menu-> Home), in addition to clicking on any of the projects shown, you can select any one of the circled locations on the screen. Those labeled New Project will take you to a blank Canvas screen, otherwise you’ll go to a list of available projects that will be filtered according to your selection (View All near Cards will show you all the available projects in the Cards category).


- On the Canvas Screen, there are three places.
- MyProjects filters to just the projects you’ve made
- New creates a new project in the canvas (prompting you to save any work in progress)
- Projects lists all the projects.
Using the Design Space Android App
The Home screen is effectively the Projects screen.


How Do I Get Back to My Project?
➀ The specific instructions vary by device. The basic idea is to find the Projects screen, filter to My Projects, then select your project. Open the section relevant to your device and find the My Projects screen.
If you enter Cricut Design Space from the icon on your desktop, your projects should be listed front and center:

If you are in the Canvas screen, there are two places to find your projects. One is to click the ☰ Menu button then select Home. This takes you to the screen, above.

The other is to click My Projects on the Header, which takes you to the Projects list pre-filtered to “My Projects.” (And yes, you could also click on the Projects button on the Design Panel on the left side — then use the dropdown to select “My Projects.”)

Opening the Cricut Design Space app takes you to the Project screen. Tap on the “All Categories” dropdown, then select “My Projects.” You’ll see your Lesson 3 project.


Opening the Project
➁Once you’ve found your project, click on the thumbnail of your project to begin opening it. A description of the project opens:


➂The descriptive screen shows a thumbnail of your project (square gift tags make for a boring thumbnail!), the title, who made it (if you opened a project that wasn’t one you made), and images and fonts used in the project). There are three buttons at the bottom:
- Edit allows you to change the title or other information that describes the project.
- Customize takes you to the Canvas screen so you can make changes to the items in the project.
- Make It takes you directly to the Prepare screen so you can lay out your mat and connect to your Cricut machine.
Click on Customize to take you back to the Canvas screen.
Congrats!
The last three lessons have covered a lot of ground! You’ve learned the basics of opening Design Space, placing a shape, resizing it, loading a mat, and getting the machine to cut out objects you placed. And you can save your project and find it later. Congratulations! And you’ve got two little pieces of paper, I mean gift tags, to show for it.
The next lessons assume you are very familiar with these three lessons and will use many of the other features of Design Studio to make more detailed and useful gift tags.
Because the next lessons assume you are familiar with these three lessons, you might want to do one or more of the following challenges:
- Open a new project and place a star. Keeping the same proportions, resize it to about 4″ (10cm). Make it on a new piece of cardstock (not the one used in Lessons 1 and 2).
- Open a new project and place a circle. Resize it to be an oval about 2″x 3.5″ (5x9cm). Save it as “Oval Tag.” Make it on the sheet of cardstock you used above.
- Open a new project and place a shape of your choice. Resize it to about 4.5″. Make it on the same sheet of cardstock.
How’d you do? Hopefully you’ve got three more shapes that you’ve cut out!