This is the fourth in a series of projects to learn to use the features of Cricut Design Space. These projects create something that likely everyone can use: gift tags! They are small, quick projects designed to be useful and use inexpensive cardstock to learn how to use Design Space.
This layered tag looks simple (and it is!), but is excellent for learning several very useful techniques.
| Skills Covered | Materials Needed |
|
|
To begin this lesson, open up your project you might have saved as
“Lesson 3 rectangle gift tag.” (Don’t remember how? See Lesson 3.)
Duplicate the Object
You may have saved either a square or a rectangle (or maybe you’ve got some other shape). Whatever you’ve got, you need two of them.
➀Select the object by clicking/tapping on it.
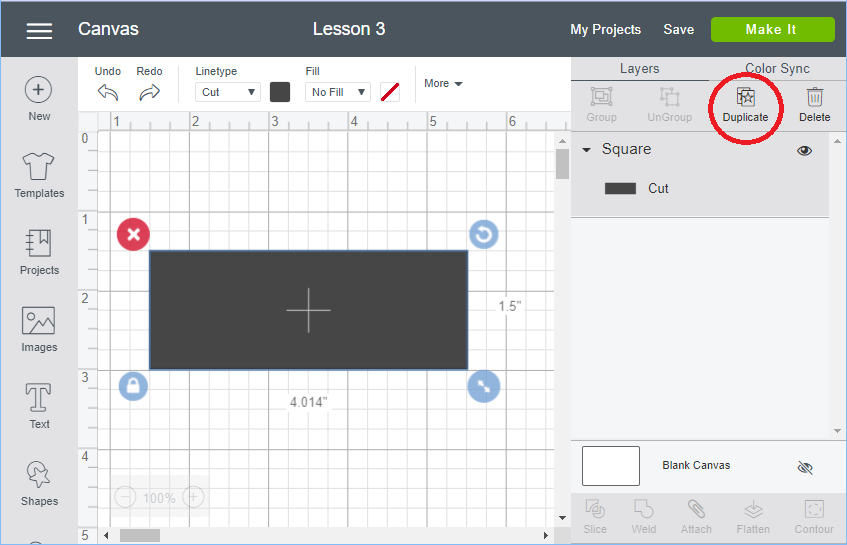
➁Find the Duplicate button and click it. A copy of the item is made down and to the right of the original and is selected.
For the Browser, click the Duplicate button at the upper right of the screen as shown in the screen shot, above.
- Pro-tip: You can use the standard Windows commands to Cut (Ctrl-X) or Copy (Ctrl-C) the item, then Paste (Ctrl-V) it.
- How do you remember the keystrokes? Cut = X it out, C for Copy, and V is an arrow pointing down to put it “here.” Those are three contiguous keys on the bottom row of the keyboard.
- Don’t like keystrokes? The browser app has you covered. Look for the Edit button,
 , and the downward triangle shows that it opens a menu to show Cut, Copy, and Paste (see screenshot, below).
 - Cut removes the selected item to let you paste it somewhere else. Copy leaves the selected item, so you’re duplicating it when you paste it. Paste makes a copy of the last thing you cut or copied.

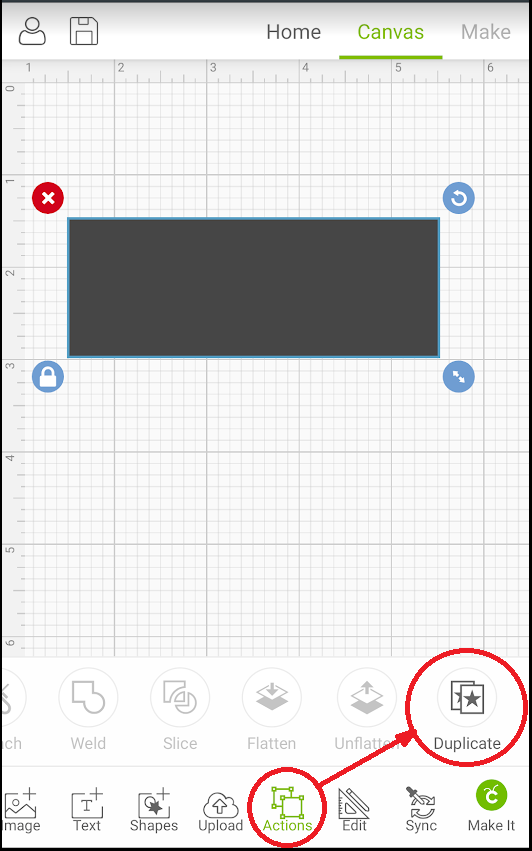
For Android, tap on the Actions button at the bottom of the screen to open a menu, then scroll to the right a bit to find the Duplicate button.
You now have two items.

The Layers Pane
In the Browser version, because you’ve got more screen space, the Layers pane is always available on the right. It shows you have two “squares” (as that’s the name of the shape that was placed and resized).

The Android version requires you to turn on the Layers overlay by tapping on the Layers button on the bottom menu. This is a toggle — tapping it once will turn it on, tapping again will turn it off.
There are a couple of differences between the versions mostly due to screen size constraints. Both versions tell you that it’s a square shape. There’s a black thumbnail showing an approximation of the shape and color, and that it’s set to cut when you make it (as opposed to Print-then-cut, draw, or score). In the Browser version, you can also see a little “eye” on the right indicating that this is visible (more on that in a later lesson).
Changing the Colors
Right now, since both rectangles are black, they will both cut on the same mat from the same sheet of material. In order to make them cut in different colors, one of them needs to change.
Since the second one is already selected, let’s change that to yellow.
➀On the menu bar, find the color change button. In a browser, it’s the black square, ![]() , in between Linetype and Fill.
, in between Linetype and Fill.
On the Android app, tap the Edit button, ![]() , to bring up the menu bar, then tap the black circle,
, to bring up the menu bar, then tap the black circle, ![]() , between Cut and No Fill.
, between Cut and No Fill.


➁In the color selector, choose the color you’d like. For this exercise, choose the yellow in the second row.

Your screen might look like the screen, below. Note that the top element in the layer pane and the color selector both reflect the color change, too.

Now repeat the above steps to turn the other rectangle blue (this lesson uses the deep blue on the same row). Don’t forget to select it, first! Below is the result.

Specifying Precise Sizes
The pictured gift tag shows a yellow rectangle with a larger blue rectangle that makes a 0.20″ (5mm) frame around it. It’s certainly possible to move the resize handle to the approximate size, but it’s much easier to type in the sizes you desire, if known.
➀Select the blue rectangle, then find the size controls based on the screens, below.


➁Note that there is a Width (W), a shape lock, and a Height (H) control. We’re going to change the rectangle a bit, so first click/tap on the lock to unlock it.
➂Click/tap into the Width and type 4.00 (or 10.00cm). In the Android app, a numeric keypad pops up to allow you to enter numbers.
➃Click/tap into the Height and type 2.00 (or 5.00cm).
Your shapes should look like this:

Now repeat the process above with the yellow rectangle, entering a width of 3.6″ (9cm) and a height of 1.6″ (4cm).

Moving the Objects
Well, that worked, but it doesn’t look like the example gift tag. That’s OK. It doesn’t have to. It will cut out two rectangles and you’ll glue them together nicely centered. This is a simple design; you may want to move the objects to see what they’ll look like in their final form.
All you have to do is click on the item to select it, then click down/press down (don’t let up) and drag the item to its new location (then let up).

We’ll cover how to do this precisely in a future lesson.
Now is a good time to save your work. We will use this in Lesson 5, too.
Preparing Your Mats
You’ll need to prepare two mats; it can be the same physical mat that you prepare with the first paper, then take the paper off and prepare it again with the second. The computer and Cricut are patient; they’ll wait. If you have one mat, be sure you pay attention to which mat goes first (note that the browser says yellow goes first, but the Android app says blue. If you make an edit to the project, the next time you make it, the mats don’t always come up in the same order. While you’re learning, it’s best to put the material on the mats as you’re prompted.
While we show this in blue and yellow, you can load the mat with any colors you want. The mat that shows blue is the larger border. Would you like that in white? Black? A patterned paper, like say, plaid? And the inside yellow piece, would you like that in orange? Blue? A pastel floral? (Just beware of a plaid and floral tag — that might not look very good!)
Making Your Tag
Are you experienced with ready-to-make projects and are already familiar with making a project with multiple mats? Great! If not, please click/tap the instructions.
➀Just like in the previous lessons, click/tap the Make It button. The Prepare screen tells in the upper left how many mats. The browser has more screen space, so you can see thumbnails of the mats along the left side with a large view of a selected mat. Click on each mat to see the larger version.

The Android version shows the number of mats in the upper corner (“1 of 2” in this case), then shows the first mat. Next to the number of mats is a triangle pointing down, indicating this is a drop-down control. Tap on that to see the thumbnails of mats down the left side of the screen. Tapping on each mat shows it in the larger format.


➁Nothing needs to be changed on these screens. On the lower left of the screen, press the Continue button.
➂The Make screen works just like it does in Lesson 1, although you’ll do it twice, once for each color. Load the first mat with the Load/Unload button, press the flashing Cricut button, let it do its thing, then press the Load/Unload button again to unload the mat.
➃After unloading the first mat, remove the rectangle and the paper, reloading it with the other color. Following the prompt on the screen, load the mat with the Load/Unload button, press the flashing Cricut button, let it do its thing, then press the Load/Unload button.
Pay close attention to the order in which you feed the mats, preparing the cardstock on the mat as you’re prompted (especially if you only have one mat). And especially if you’re using different colors of material than is shown on the screen. Not that I’ve ever made that mistake often…nooooo…not me! Hahahaha.
Assembling the Tag
Now all that’s left to do is to attach the smaller piece to the larger! Use glue (school glue is fine), though I find it might wrinkle the paper. A glue stick is great for projects, but over time, the adhesive seems to degrade. It’s fine for things like gift tags that don’t need to last long, but an heirloom card that someone will keep or an item for a party that needs to be a bit sturdier, I find that double-sided tape or a glue tape runner works wonderfully.
Put the adhesive on one object (using the smaller object ensures you don’t get glue outside of where you want it), then align it and press it on to the other object.
Voilà! You have another tag! And you’ve hopefully learned a few more skills.
Using the same two pieces of paper, can you make a layered heart or star? Can you increase the width of the frame to .3″ (8mm?) Can you make a double-sided tag by duplicating the smaller star and affixing the smaller shape to both sides of the large one?