Before putting a mat loaded with $20 of heat transfer vinyl (HTV) or that last piece of expensive, gorgeous cardstock that you can’t find anymore, you might try to cut a small test cut. It’s a quick project that you can save to use each time you need to test your settings.
1. Open a New Project
| Shown at left are the icons to look for to open Cricut Design Space. The Windows icon is on the left and Android is on the right. The shapes and colors may look different depending on the version of the operating system on your device and the Design Space software. Click or tap on this to get into the Design Space software. |
  | After you open the Design Space app, the New Project button should be visible on your screen. Depending on your device and version of Design Space, it could be a different color. Press this button to open the Design Space Canvas. |
For more information on the Main Design Space screen, see:http://inspiredsquirrel.com/cricut/design-space-home-windows/
Your screen should show a blank Canvas screen, as shown below.


For more information on the Canvas Screen, see the Canvas Screen Overview.
2. Add a Shape
Use a shape like a circle, heart, or star, as these use curves and diagonals that can stress the paper a bit more than a rectangle.
Use the Shapes tool found on the Design Panel menu. The Design Panel is located on the left in a browser; it’s across the bottom on Android screens.
➀Click on the Shapes tool to bring up a menu of basic shapes.


➁Select the desired tool, such as a Square, by clicking/tapping on it. The shape is placed in the Canvas window.


- This is one of the few menus that will stay open in case you want to add multiple shapes. Click anywhere outside of the menu to close it.
- There’s a notable difference between the browser and the Android functionality. In the browser, the shape is selected by default, indicated by the red and blue circles on the corners. The Android version does not select the shape — simply click on it to select it.
- Design Space places items somewhere on the screen at a predetermined size (3.11″ for squares). There doesn’t seem to be a way to influence where it will place the shape or affect the size of a shape.
3. Resize the Shape
Resize your shape to at least a half-inch wide (or high), but probably not more than an inch tall. You don’t want to waste a lot of material, you just want to see if it cuts properly. If you’re really short on material, go down to 0.25″ or so.
➀Click and drag the Resize handle. ![]() (Note that when you click on it, it gets a shade darker.
(Note that when you click on it, it gets a shade darker.

➁Drag the handle to the desired size.
4. Make It
Make your project.
- Remember to place heat transfer vinyl (HTV) with the shiny side down; most other media goes face up.
- Get into the habit of mirroring your heat transfer vinyl (HTV) because it’s good practice. It won’t matter if you forget, though as you’re looking to make sure i.t cuts well.
- Don’t forget to change the dial on your Cricut machine to the desired material!
Watch for it to tear, smoosh, or otherwise not work well. When it’s finished, unload the mat, then try to remove the small shape with a weeding tool. If it cuts completely through with no issues, your setting is correct. If not, you know to work on something. If it’s not cut completely through, try the + version that’s a click clockwise (like Iron-On+ or Cardstock+). If it’s cutting through the mat (or for HTV, the clear sheet), try one click counter-clockwise.
5. Save Your Project
If desired, save your project. A suggested name: Test Cut. Simple and to the point! You might want to use it again!
On the Header bar at the top of the screen, find the Save button. In a browser, it will say “Save.” In the Android version, look for the floppy disk icon ![]()
![]()
![]() .
.


Note that on the Windows/browser version, the Header has “Untitled*” in the middle. This is the project name (also called file name). The asterisk at the end is the “dirty file indicator.” No…it’s not mature content! It’s simply saying that you haven’t cleaned up after yourself and saved it.
➀Press Save, and since your project hasn’t been saved before, a dialog comes up to save your project, shown below. If you have previously saved your project, this dialog does not appear as it saves it with the same name.
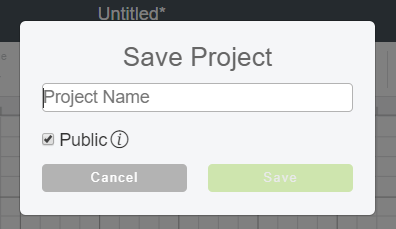


The Save Project dialog. Browser version on left, Android on the right.
➁ Type in the name of your project. Try to be a bit specific. “T-shirt” probably will be too general if you’re looking at making a series of T-shirts. Maybe “Floral Mother’s Day T-shirt” might work better.
The Windows/browser version has a checkbox for Public. This allows anyone with the specific link to access your project. It will NOT make it freely available for anyone to find through a search unless you post the link in a public area (you need to do a lot more to add projects to the Cricut community). This option is not available on the Android app.
➂Press the green Save button. You’ll see a confirmation message that your project has been saved. Windows shows at the top of the screen, Android shows unobtrusively on the bottom (in other words, you might miss it!).